 G-Track
Driver app
G-Track Driver app manual
iPhone and Android · Updated 25 October 2026
Step-by-step guide for drivers. Every step shows the iPhone app on the left and the Android app on the right. The red box and arrow mark exactly where to tap or look.
1Install and sign in
Install G-Track Driver from the App Store (iPhone) or Google Play (Android). Your fleet gives you the email and password; only accounts with the driver role can sign in.
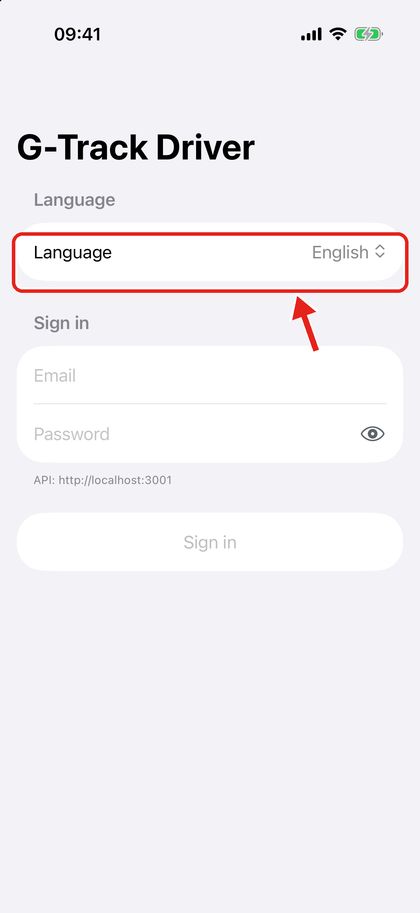
Open the app. Choose your Language (English or ไทย) at the top — you can change it later in Profile.
iPhone 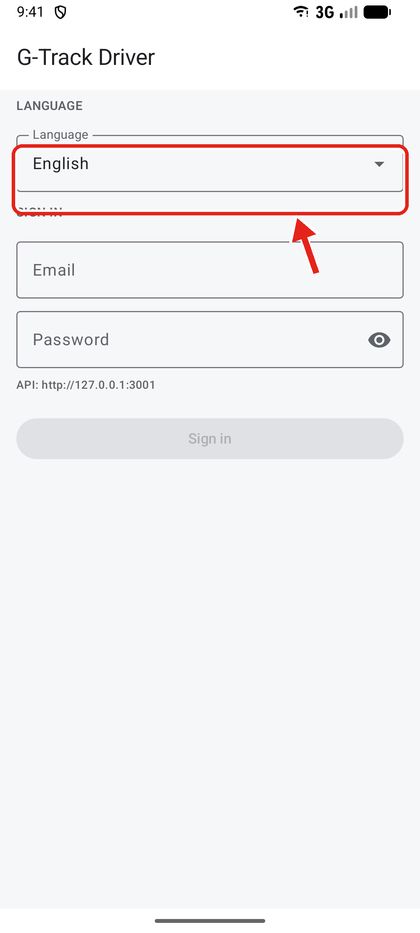
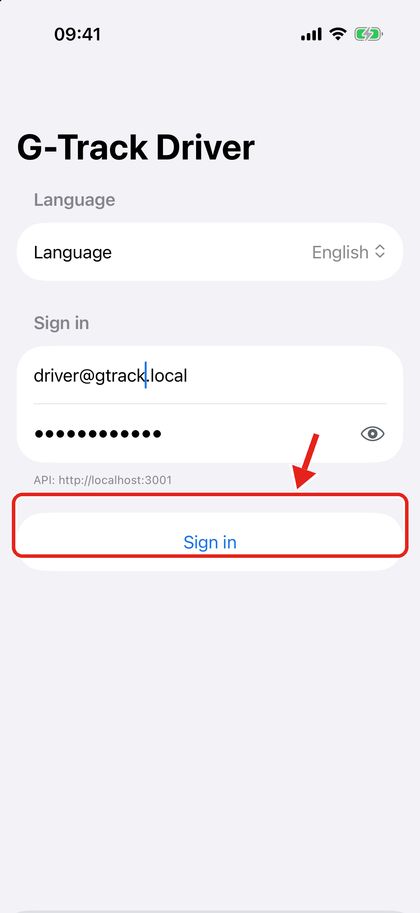
Android Enter your Email and Password. Tap the eye icon to show or hide the password, then tap Sign in.
iPhone 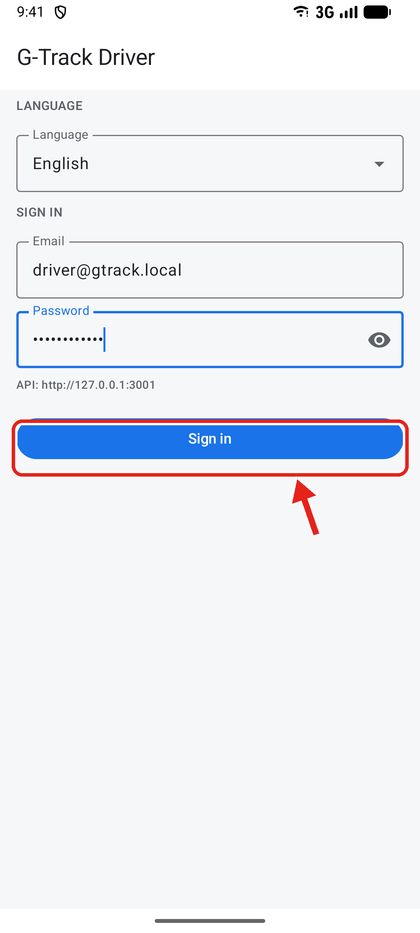
Android
You stay signed in until you tap Sign out in Profile.
2Allow location (live tracking)
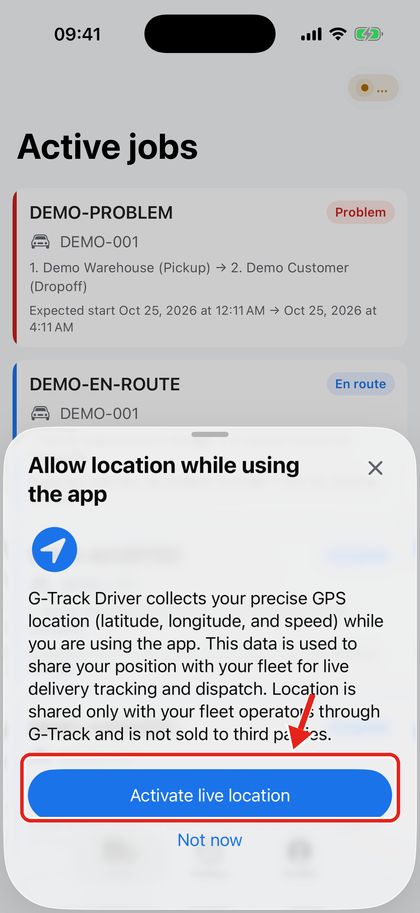
Right after you sign in, the app explains why it needs your location. Your fleet sees your truck on the live map only while location is allowed.
Read the explanation and tap Activate live location. (Not now skips it — you can turn it on later in Profile.)
iPhone 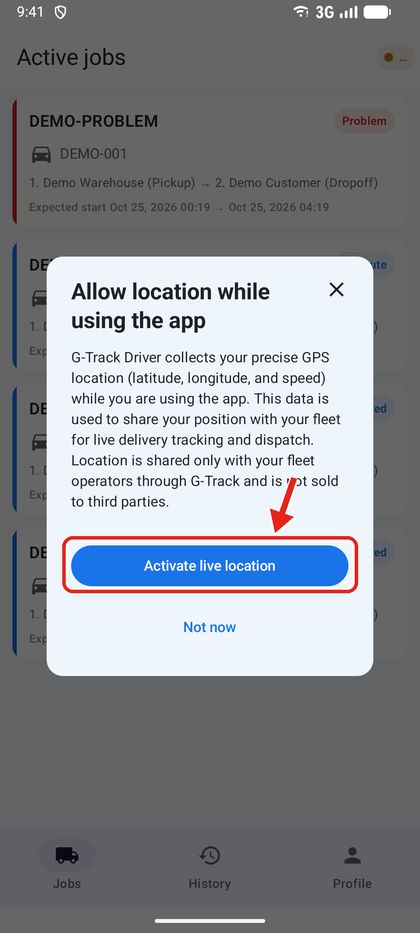
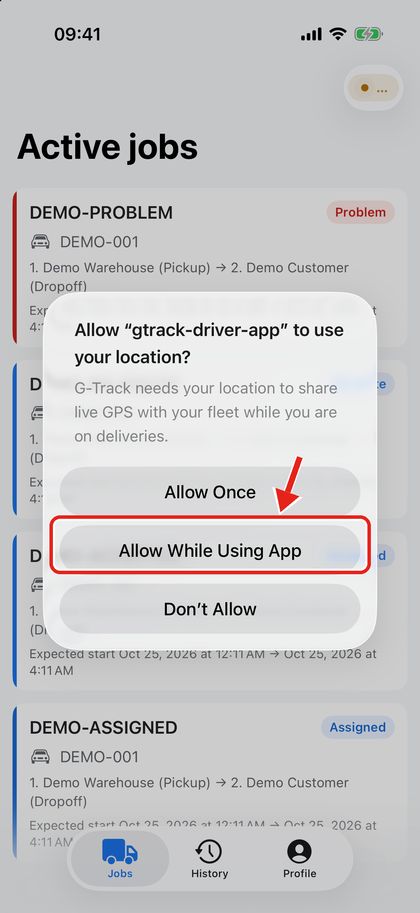
Android In the system prompt choose Allow While Using App (iPhone) or While using the app with Precise (Android).
iPhone 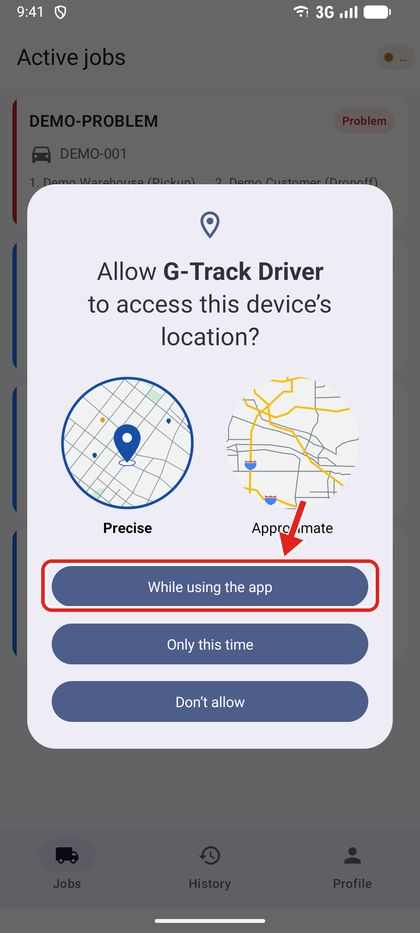
Android Allow notifications so you get new job and chat alerts (iPhone asks right after you sign in).
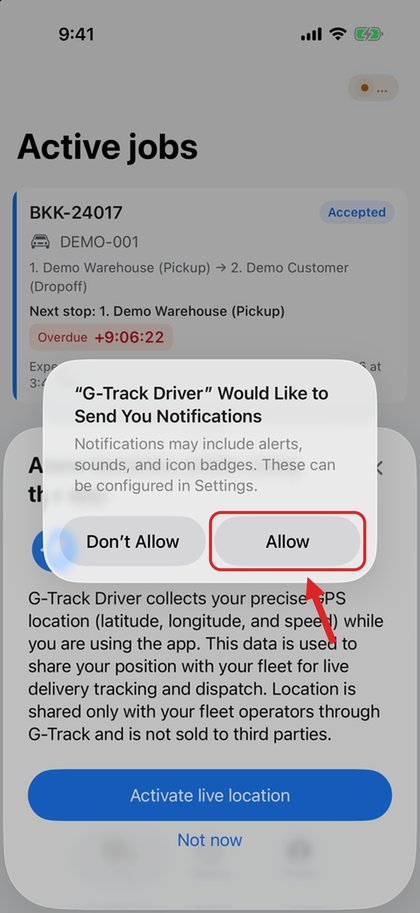
iPhone 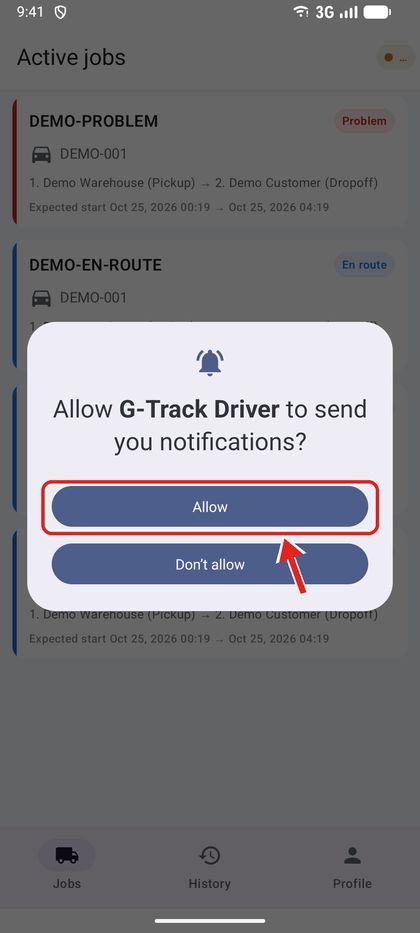
Android To keep tracking while the phone is in your pocket, allow background location. The app shows a second sheet, Allow location all the time — tap Activate live location again.
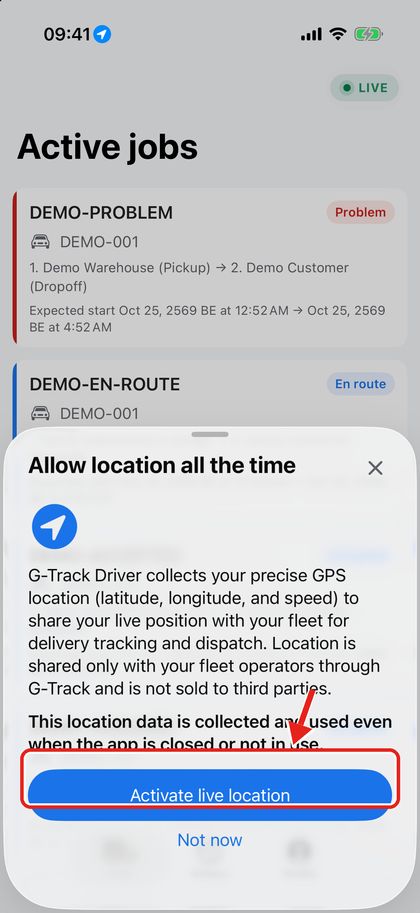
iPhone 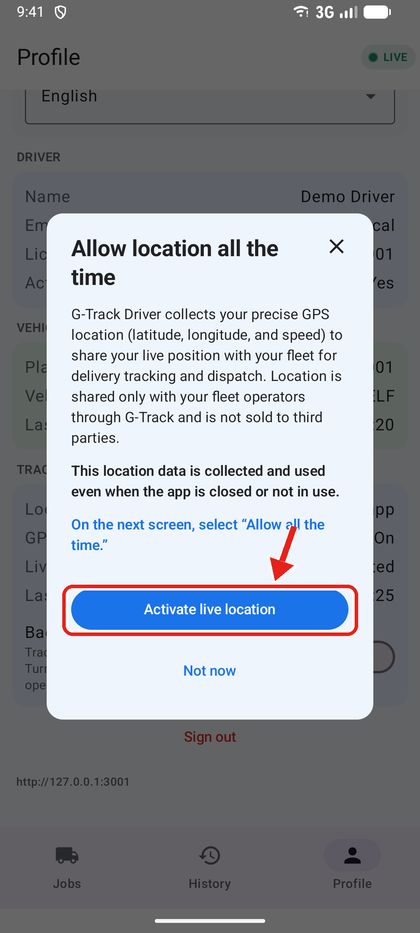
Android iPhone: iOS asks again — choose Change to Always Allow. Android: the system settings page opens — choose Allow all the time and go back.
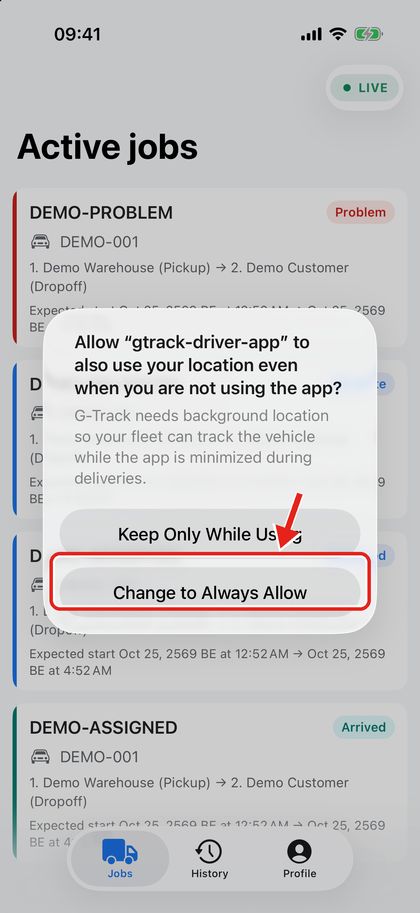
iPhone 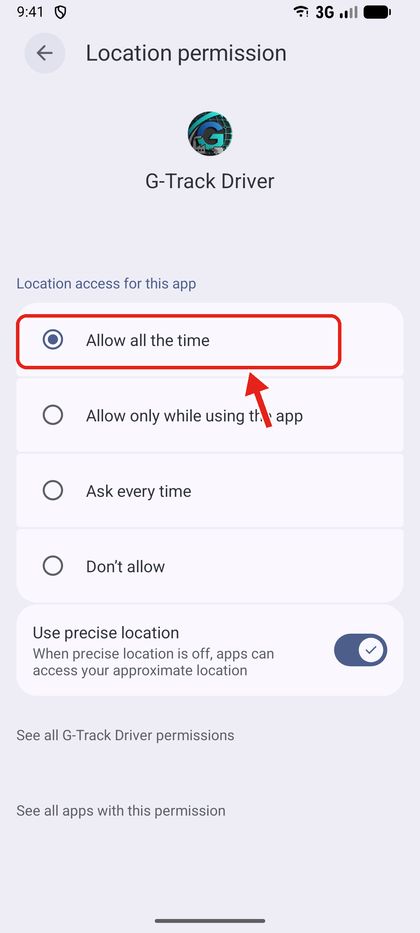
Android
The badge in the top-right corner shows tracking status: green LIVE means your location is reaching the fleet; amber means it is connecting; OFF means tracking is stopped.
3Your jobs
The Jobs tab lists every active delivery assigned to you.
Each card shows the job code, status, truck plate, the route of stops, and the expected start and finish time. Pull down to refresh. Tap a card to open it.
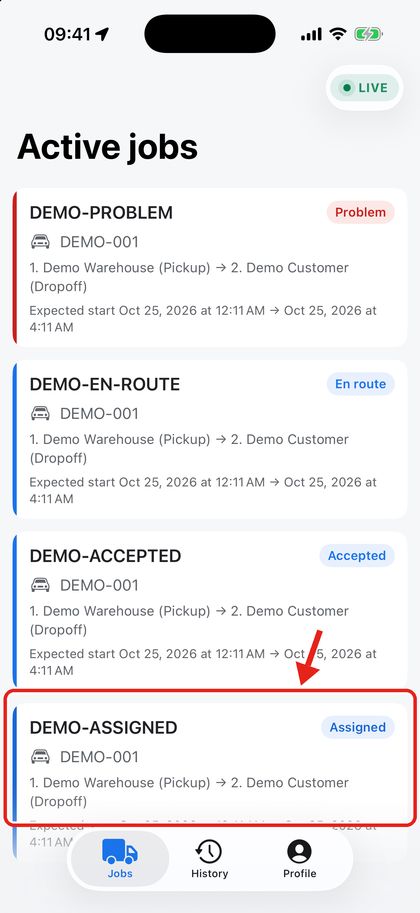
iPhone 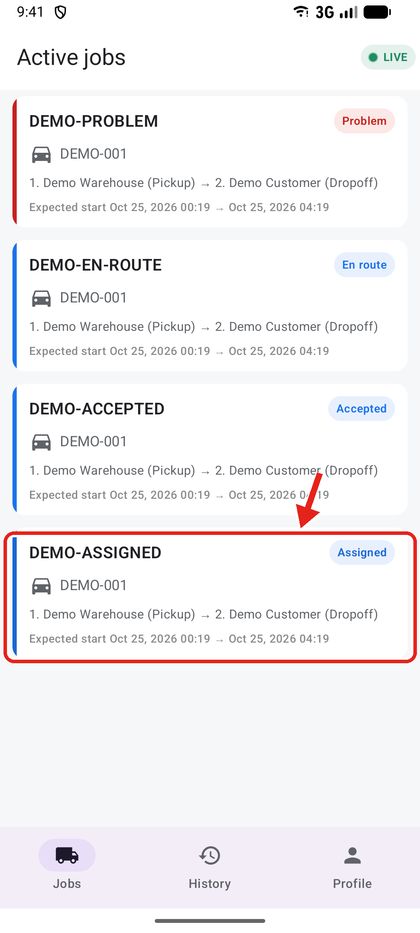
Android
4Job details and stops
The job screen has everything you need for the trip.
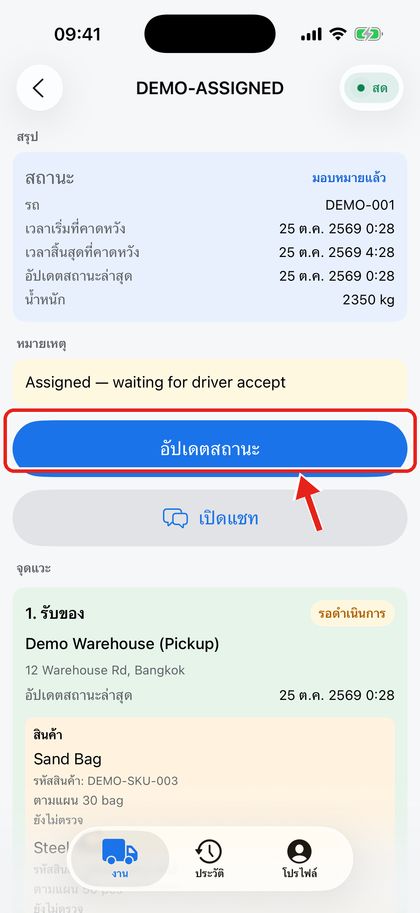
Summary shows the status, truck, planned times and weight. Notes come from dispatch. The two buttons are Update status and Open chat.
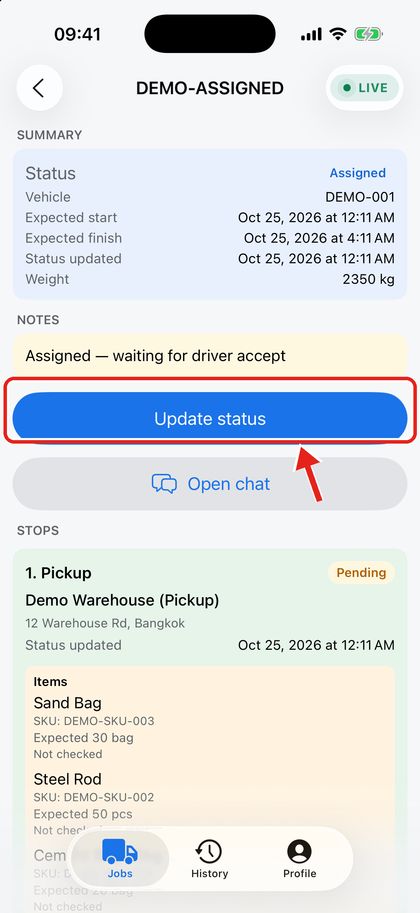
iPhone 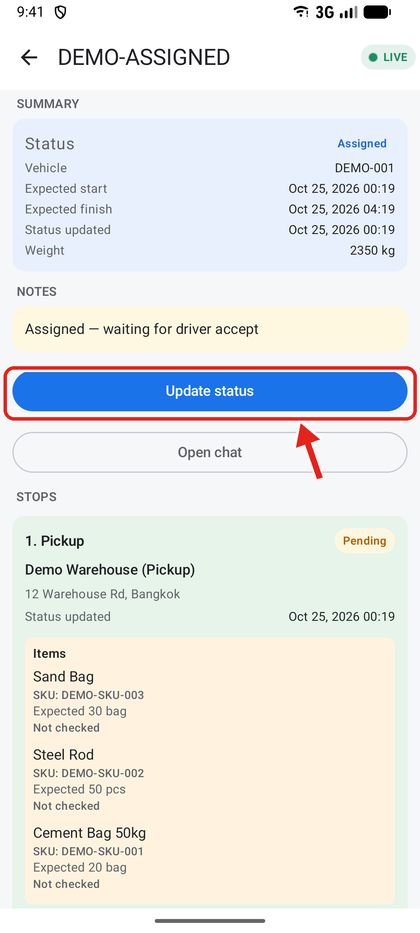
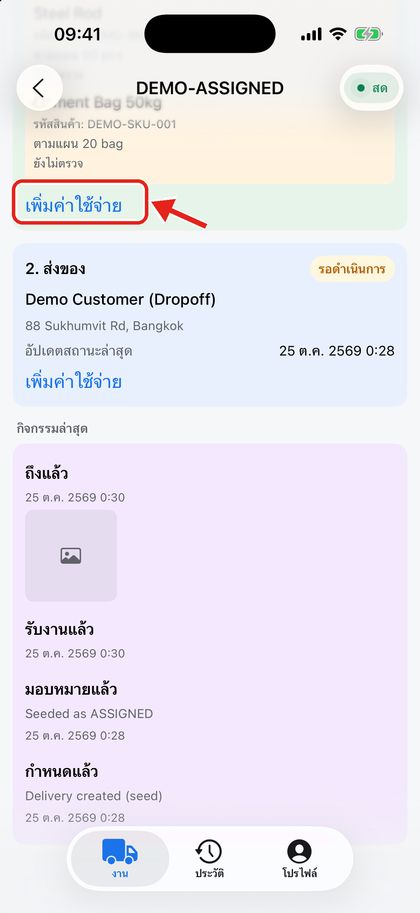
Android Scroll down to Stops: each pickup and drop-off has its address, status, the item list with expected quantities, and an Add expense link. Recent activity at the bottom lists every status change.
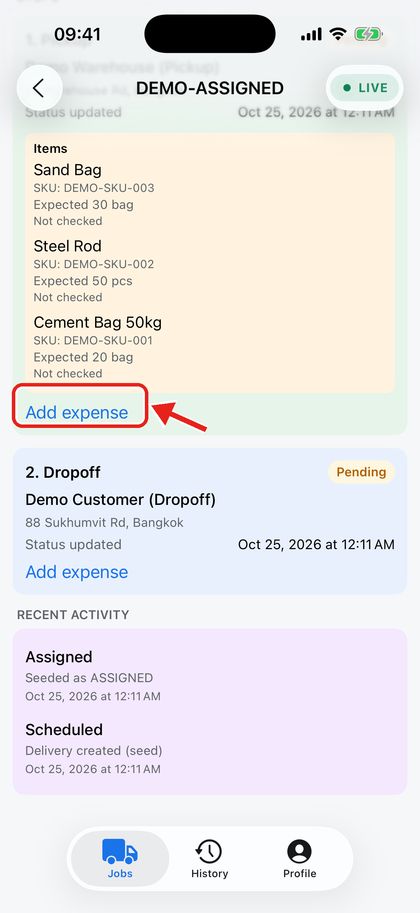
iPhone 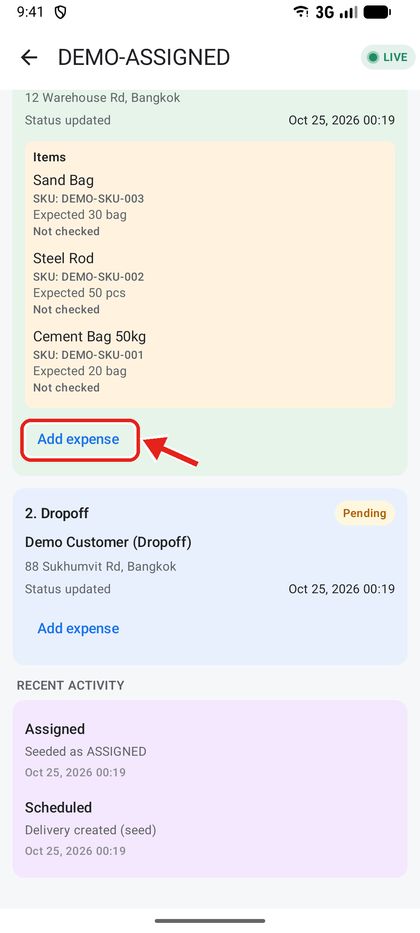
Android
5Update the job status
Move the job forward at each step of the trip. The app only offers the next valid status: Assigned → Accepted → Arrived → Loading / Unloading → En route → … → Completed. Problem is available at any step.
Tap Update status. The sheet shows the current status, the Next status, optional notes, and the stop it applies to.
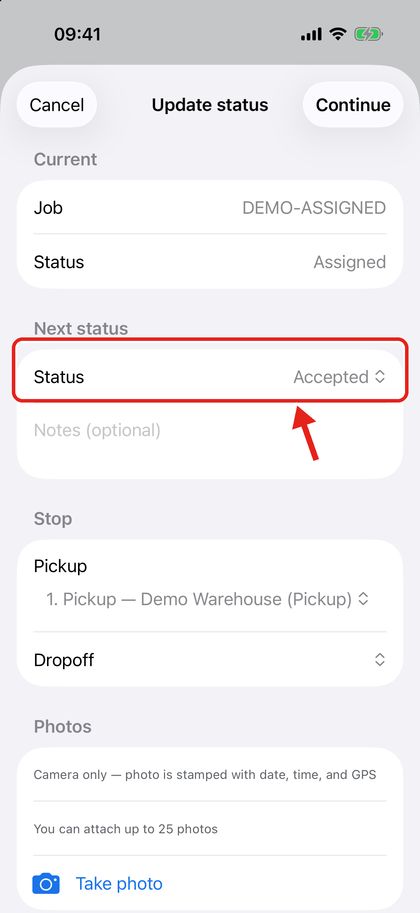
iPhone 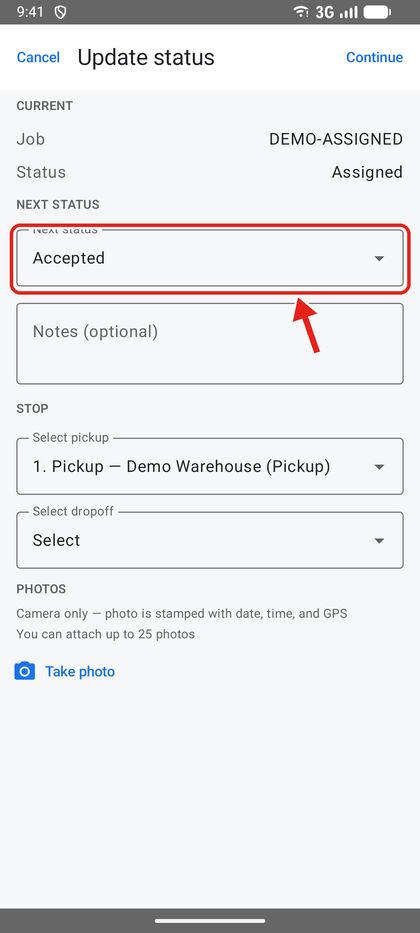
Android Tap Next status to pick a different option, for example Problem if something went wrong.
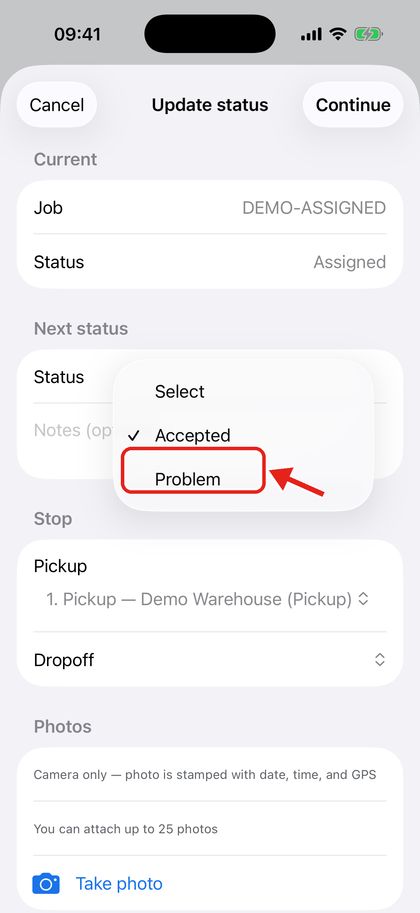
iPhone 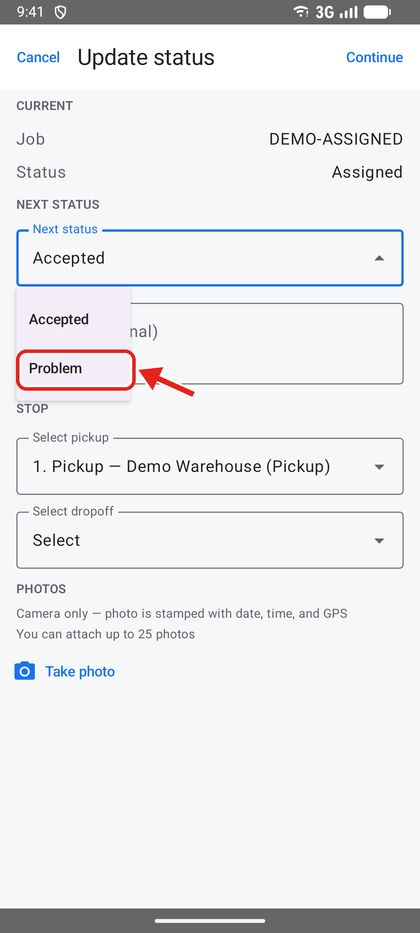
Android Tap Continue, check the summary and tap Confirm.
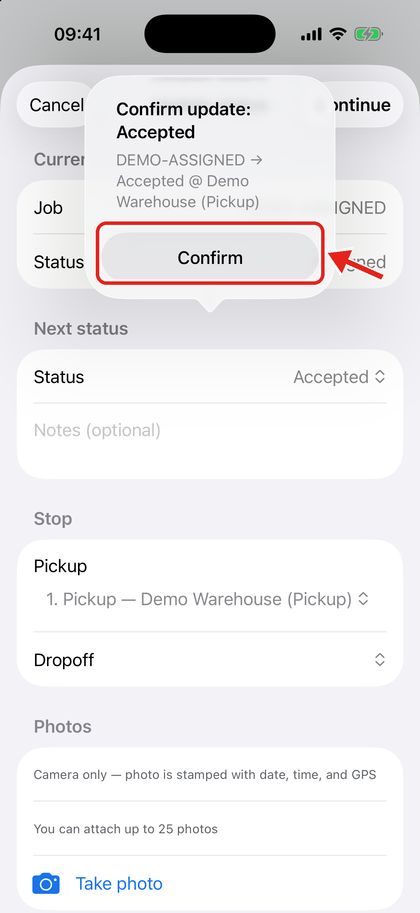
iPhone 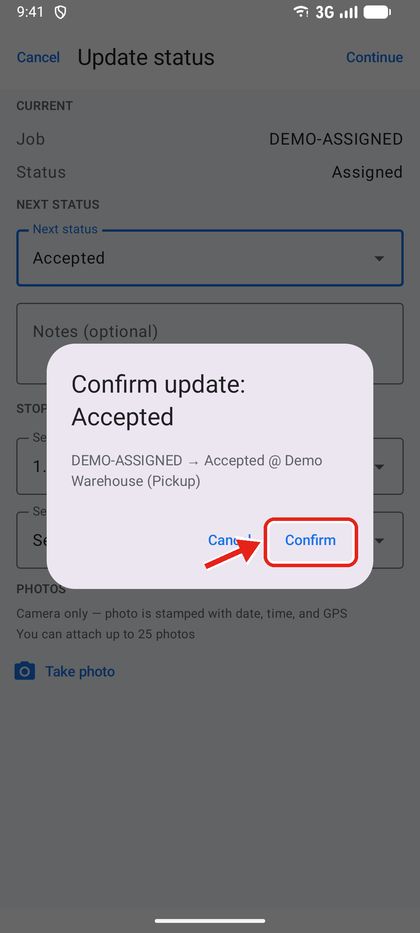
Android The new status appears on the job straight away and dispatch sees it on the console.
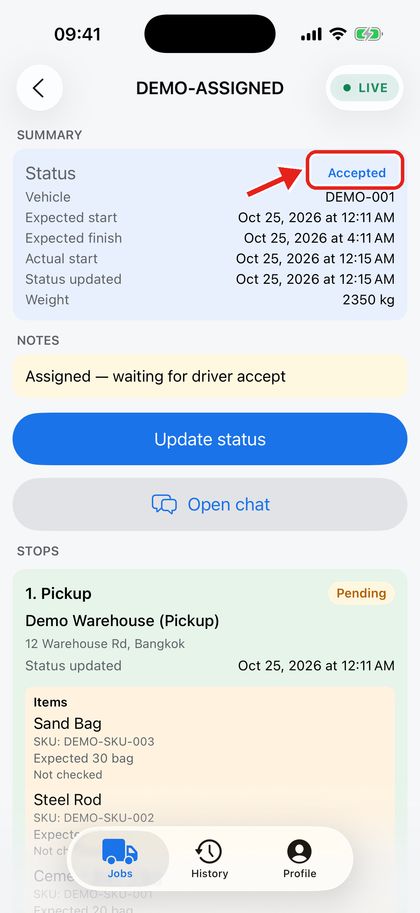
iPhone 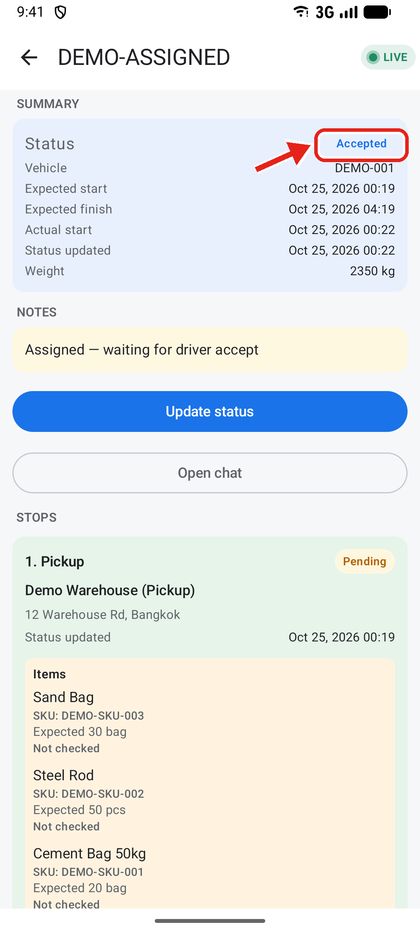
Android
6Photos and item checklist
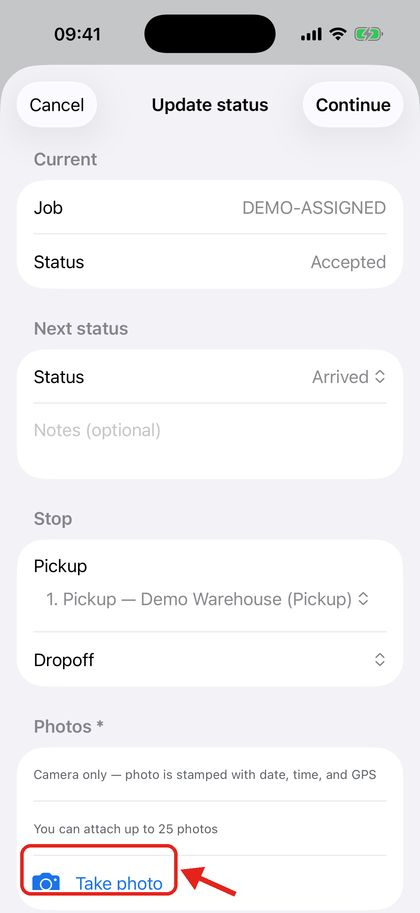
Arrived, Loading and Unloading need at least one photo. Photos are camera-only and stamped with date, time and GPS; you can attach up to 25.
When the next status needs a photo, Photos * is marked required. Tap Take photo.
iPhone 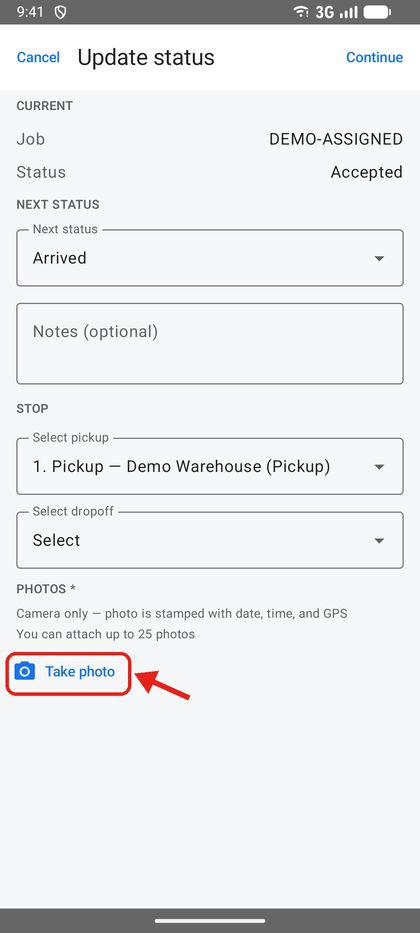
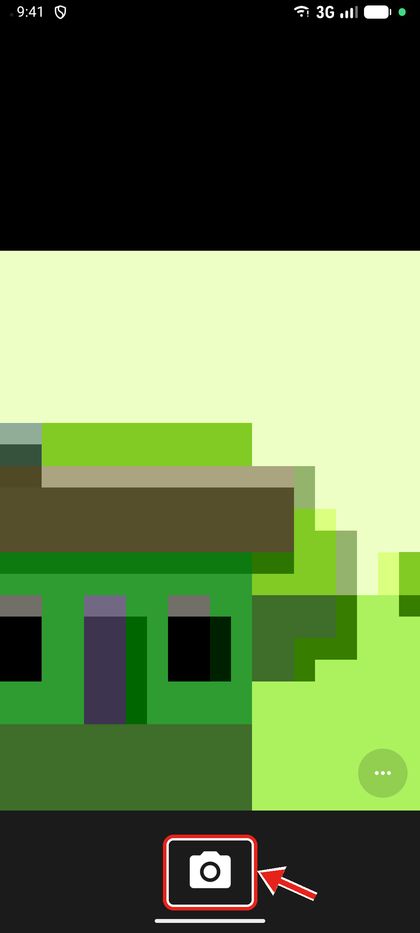
Android Take the picture with the camera and tap the check mark to use it. (The first time, allow camera access.)
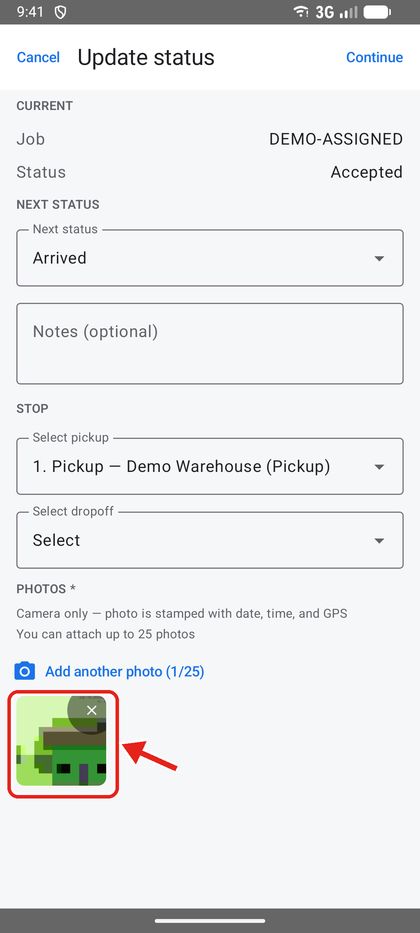
Android The photo is attached to the update. Tap Add another photo for more, or the × to remove one, then Continue.
Android After you arrive, moving to Loading or Unloading shows the Item checklist. Tick each item and correct the Actual qty; if something is short, describe what is missing. The stop stays locked until you go En route.
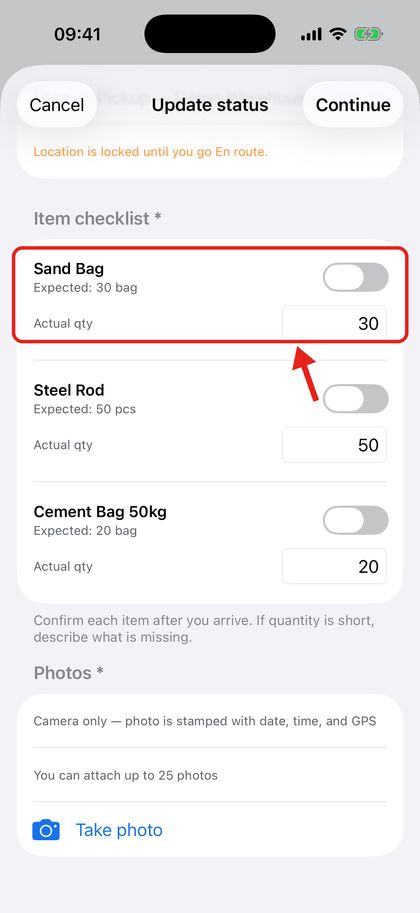
iPhone 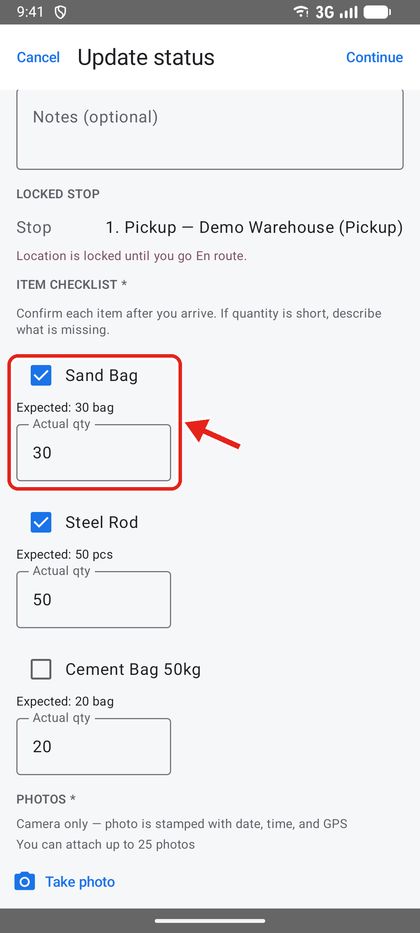
Android
The iPhone Simulator has no camera, so the camera screens are shown from Android. On a real iPhone the camera opens the same way.
7Add an expense
Record tolls, fuel, parking and other costs against the stop where they happened.
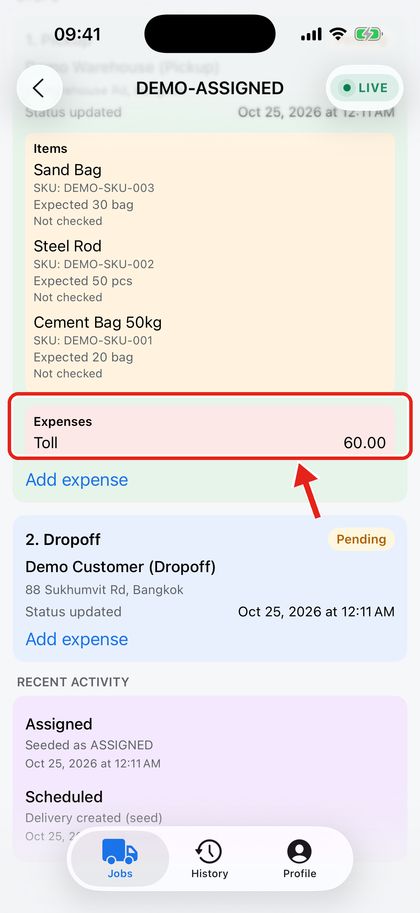
Under a stop, tap Add expense. Choose the Type (Toll, Fuel, Parking, Other), enter the Amount, add notes when required, and tap Save.
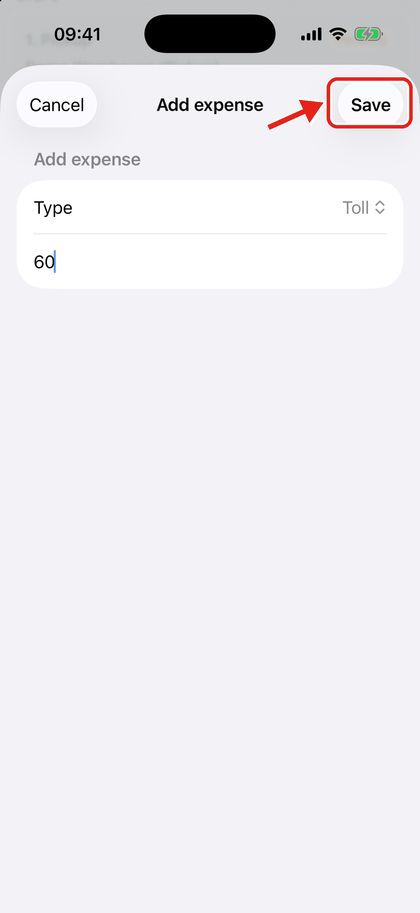
iPhone 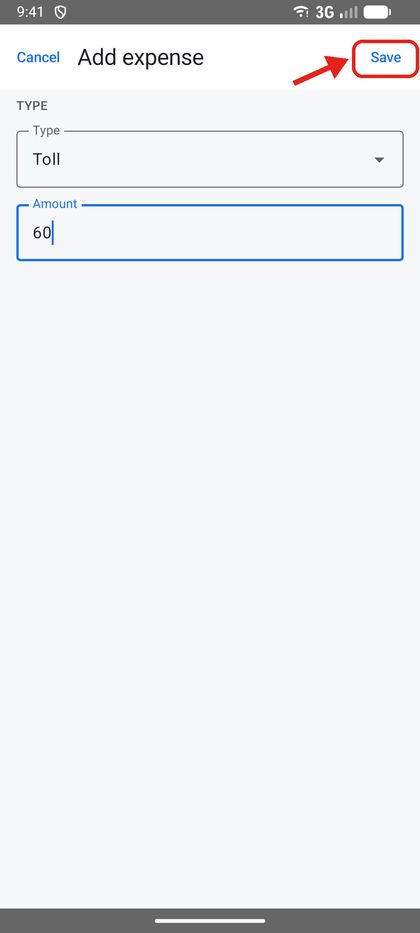
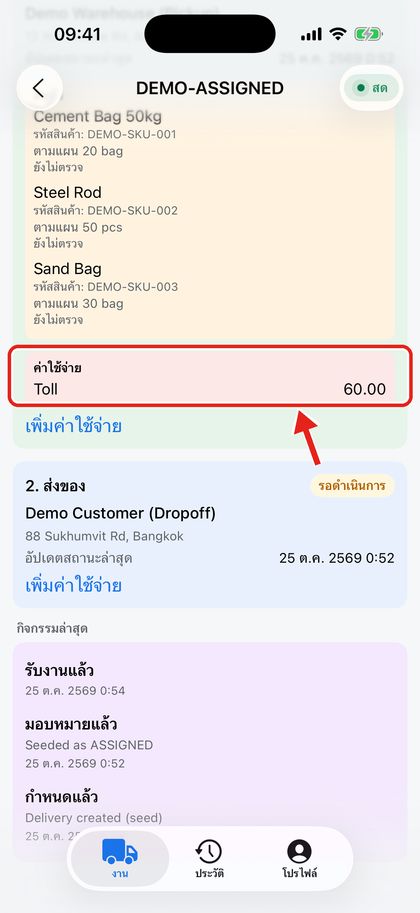
Android The expense appears under the stop in Expenses.
iPhone 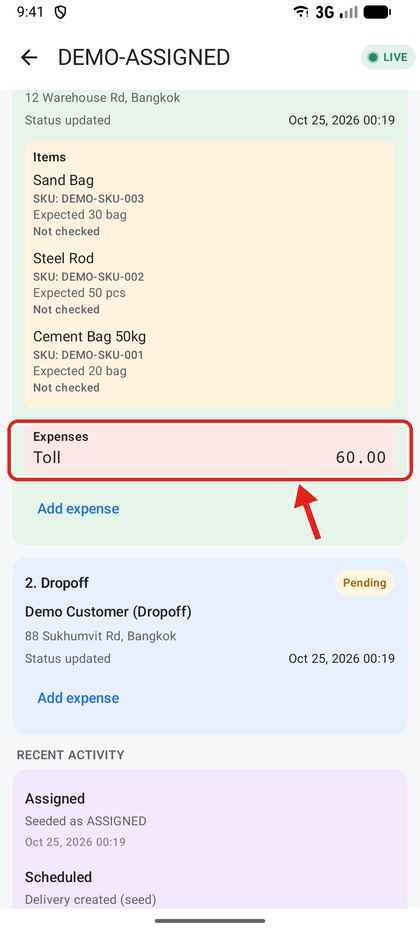
Android
8Chat with dispatch
Every job has its own chat with the fleet office.
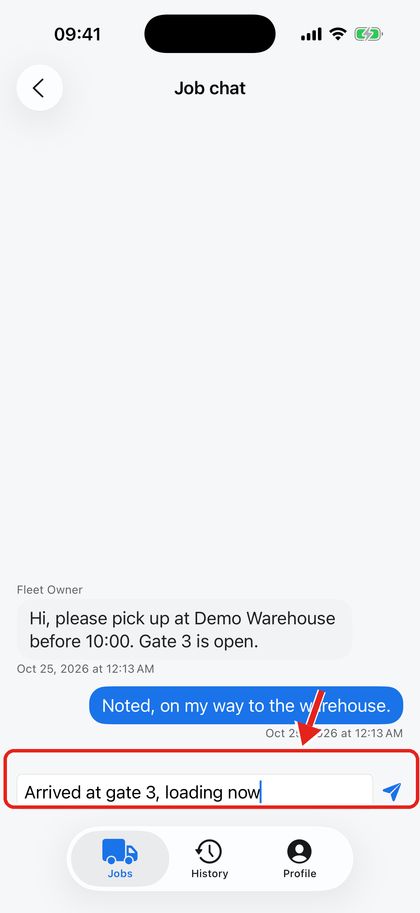
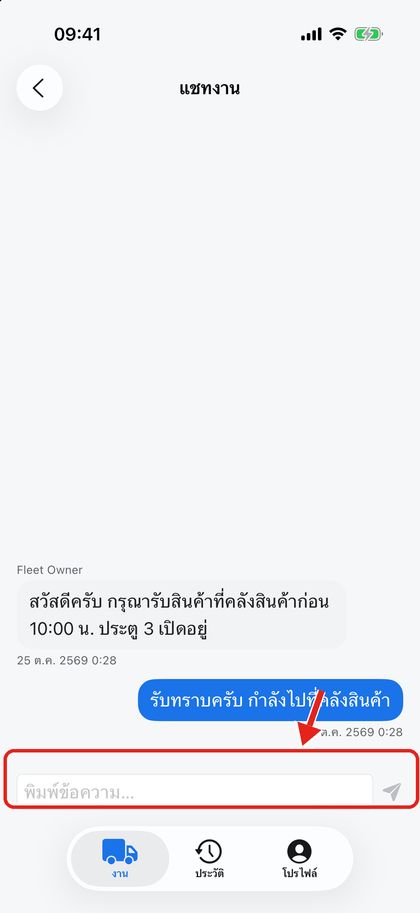
On the job, tap Open chat. Messages from dispatch are on the left, yours on the right. Type in the box at the bottom and tap the send arrow.
iPhone 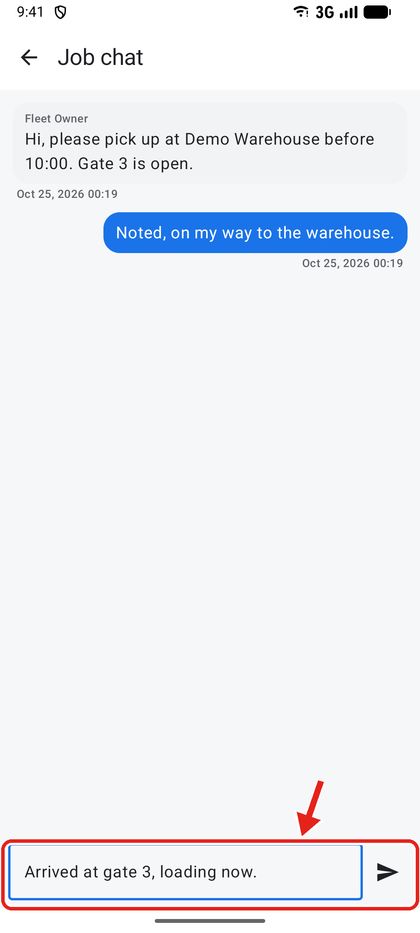
Android
9History
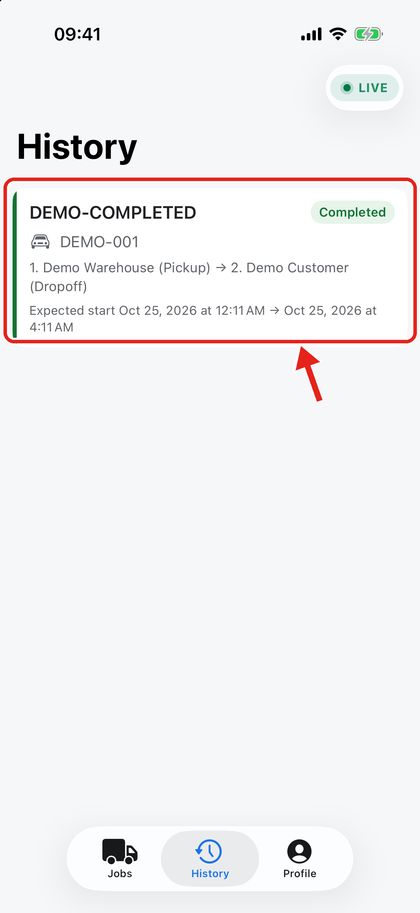
Finished jobs move to the History tab.
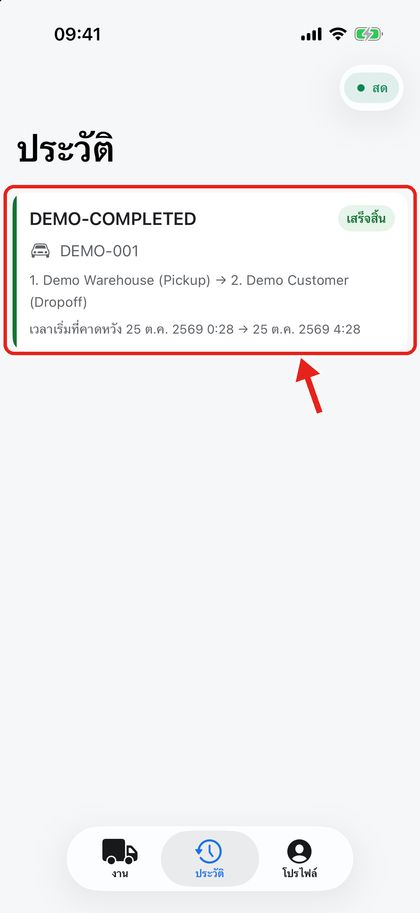
Open History to see completed jobs.
iPhone 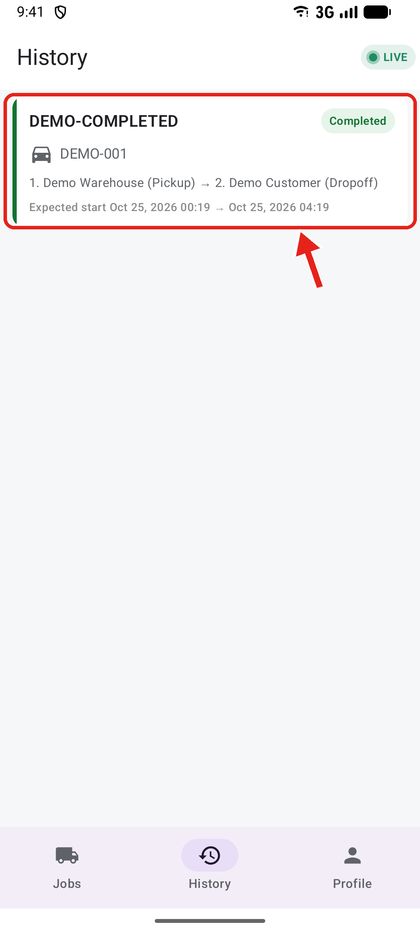
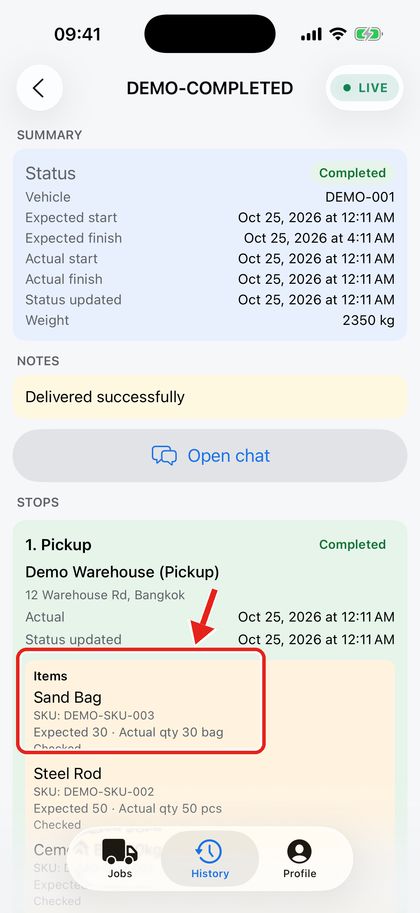
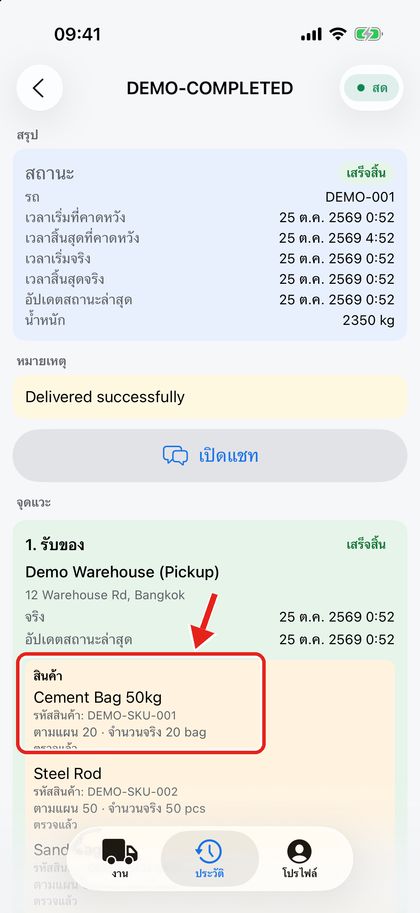
Android Tap a job to see its times, checked items and quantities. You can still open its chat.
iPhone 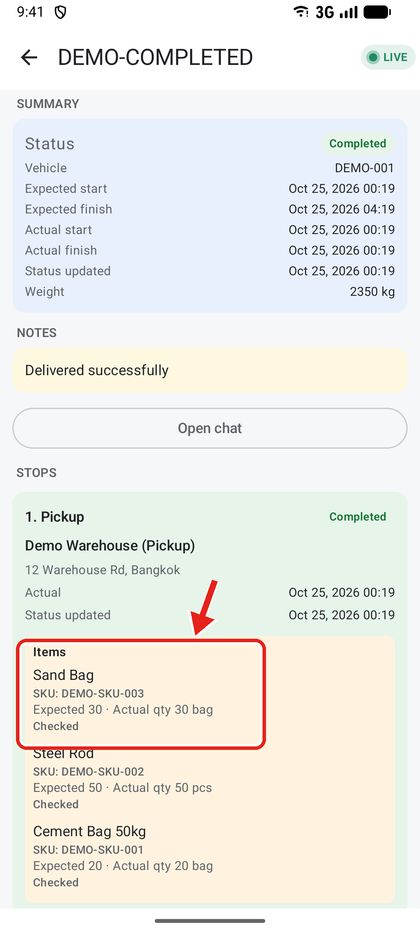
Android
10Profile, tracking and sign out
The Profile tab shows your details and lets you control tracking.
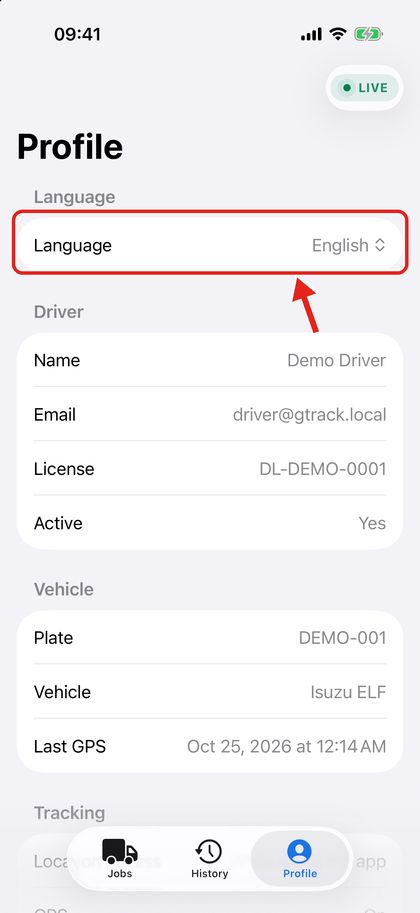
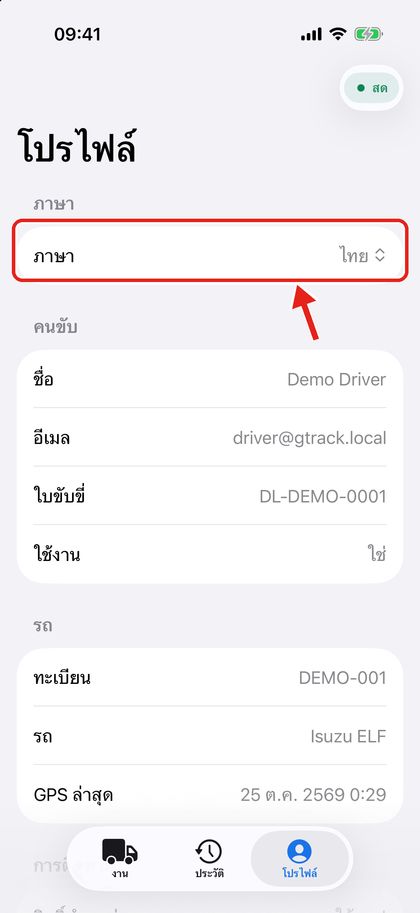
At the top: Language, your driver details (name, email, licence) and your assigned Vehicle with its last GPS time.
iPhone 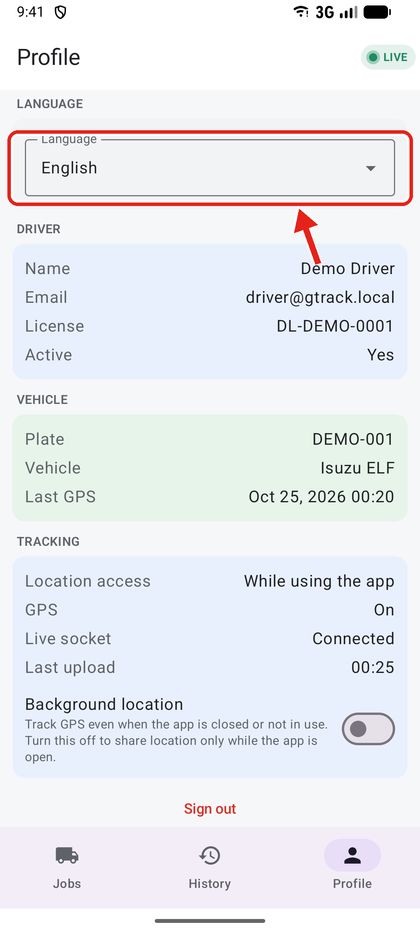
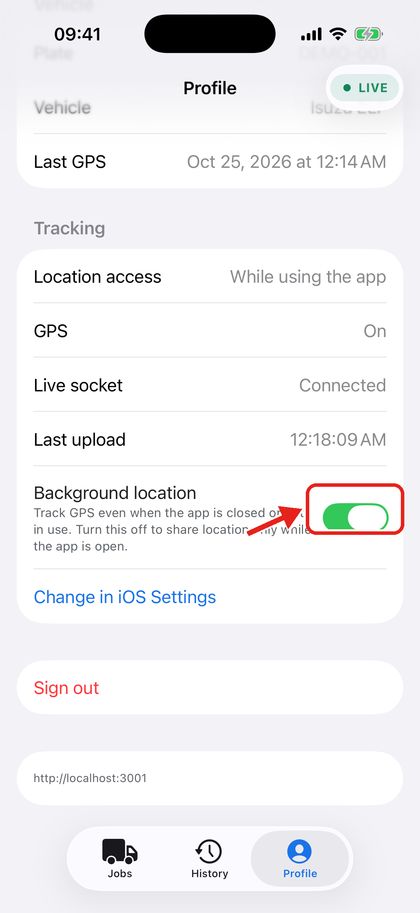
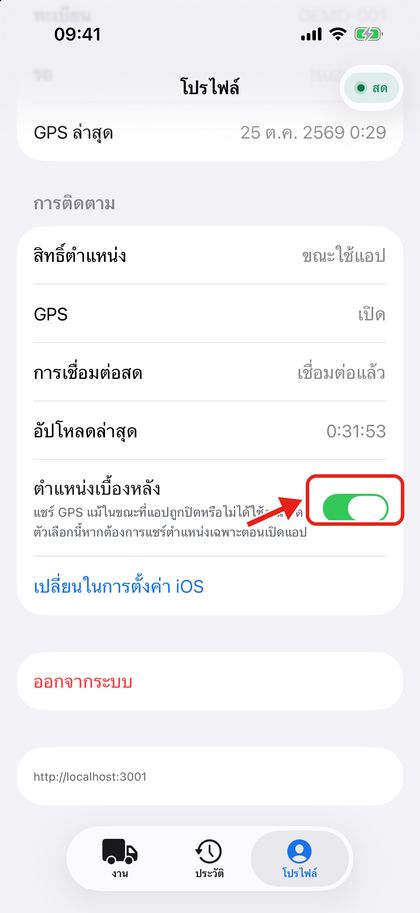
Android Scroll to Tracking: location access, GPS, live connection and last upload. Use the Background location switch to track only while the app is open, Change in Settings to change permission, and Start tracking if tracking was stopped. Sign out is at the bottom.
iPhone 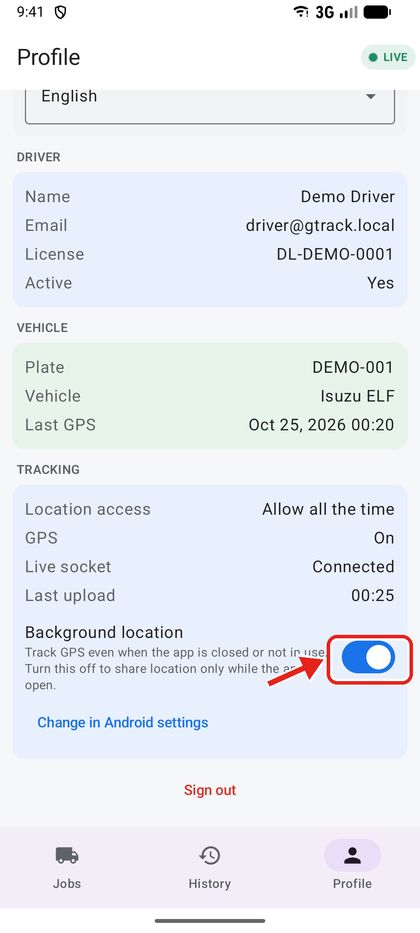
Android
11Notifications
Both iPhone and Android receive push notifications for new jobs and chat messages — even while the app is open. Tapping one opens that job or its chat.
On Android, a permanent notification also shows while your location is being shared — this keeps tracking running in the background.
Android: swipe down from the top of the screen to see Sharing location with your fleet.
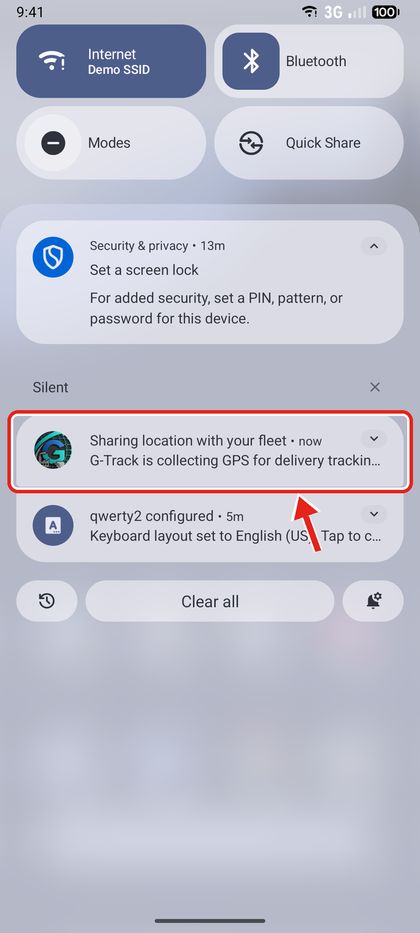
Android
iPhone has no tracking notification — iOS shows a blue location arrow in the status bar while tracking. If alerts don't arrive, open Settings → G-Track Driver → Notifications and turn on Allow Notifications.
12Troubleshooting
- The badge says OFF or stays amber
- Check that GPS is on and you have signal. In Profile → Tracking tap Start tracking; if location access is not Always / All the time, tap Change in Settings.
- “A photo is required”
- Arrived, Loading and Unloading need at least one camera photo. Tap Take photo before Continue.
- I can't choose a different stop
- After you arrive, the stop is locked until you set En route. Finish the current stop first.
- I denied a permission by mistake
- Open the phone's Settings → G-Track Driver and allow Location (Always / All the time), Camera and Notifications.
- Sign-in fails
- Check the email and password with your fleet office. Only driver accounts can use the app.
แอปคนขับ
คู่มือการใช้งานแอป G-Track Driver
iPhone และ Android · อัปเดต 25 ตุลาคม 2569
คู่มือทีละขั้นตอนสำหรับคนขับ ทุกขั้นตอนแสดงแอป iPhone ทางซ้าย และแอป Android ทางขวา กรอบและลูกศรสีแดงชี้ตำแหน่งที่ต้องแตะหรือดู
1ติดตั้งและเข้าสู่ระบบ
ติดตั้งแอป G-Track Driver จาก App Store (iPhone) หรือ Google Play (Android) ฟลีตของคุณจะให้อีเมลและรหัสผ่าน เฉพาะบัญชีที่เป็นคนขับเท่านั้นที่เข้าสู่ระบบได้
เปิดแอป เลือก ภาษา (English หรือ ไทย) ที่ด้านบน — เปลี่ยนภายหลังได้ที่หน้าโปรไฟล์
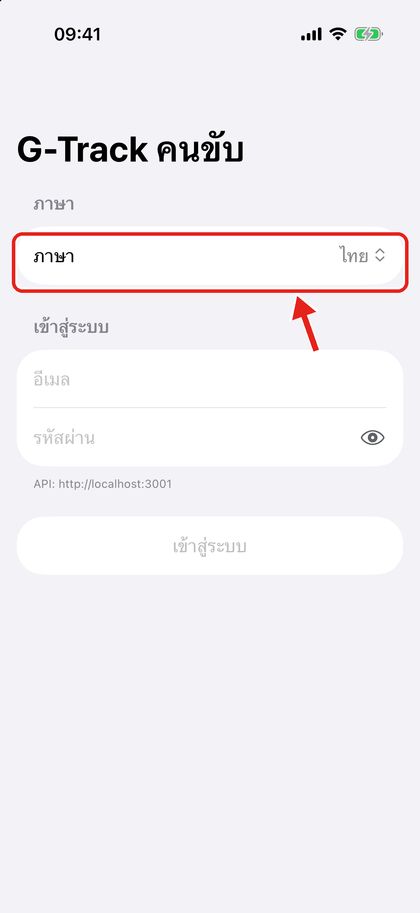
iPhone 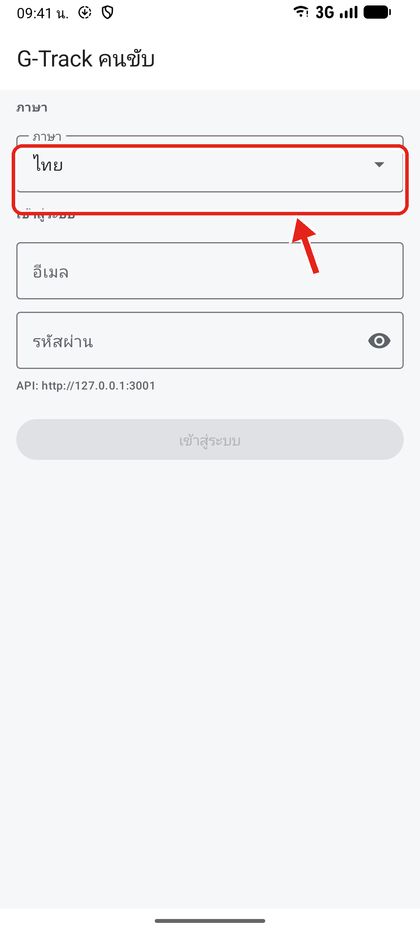
Android กรอก อีเมล และ รหัสผ่าน แตะไอคอนรูปตาเพื่อแสดงหรือซ่อนรหัสผ่าน แล้วแตะ เข้าสู่ระบบ
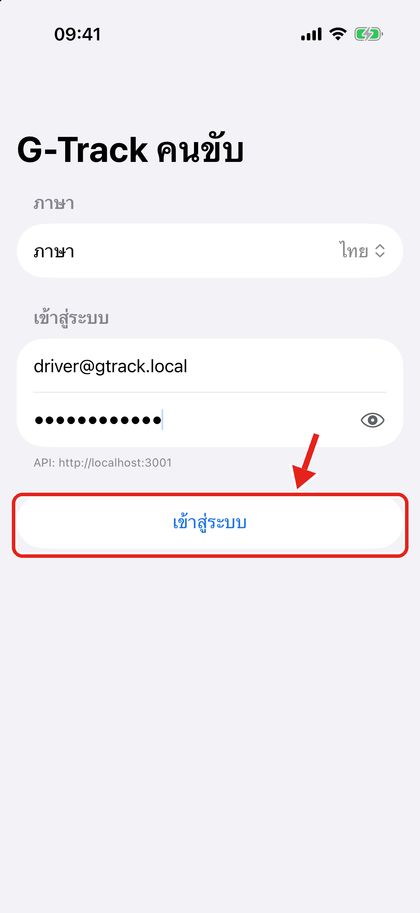
iPhone 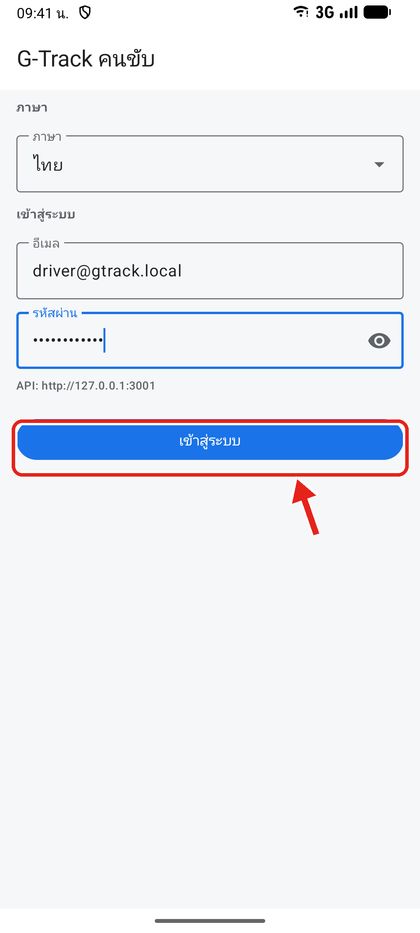
Android
แอปจะจำการเข้าสู่ระบบไว้จนกว่าคุณจะแตะ ออกจากระบบ ในหน้าโปรไฟล์
2อนุญาตตำแหน่ง (ติดตามแบบสด)
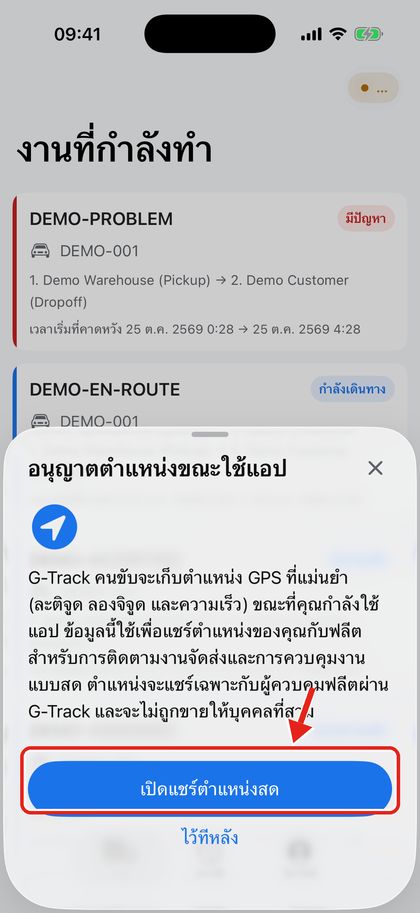
หลังเข้าสู่ระบบ แอปจะอธิบายว่าทำไมต้องใช้ตำแหน่ง ฟลีตจะเห็นรถของคุณบนแผนที่สดได้เมื่ออนุญาตตำแหน่งเท่านั้น
อ่านคำอธิบายแล้วแตะ เปิดแชร์ตำแหน่งสด (แตะ ไว้ทีหลัง เพื่อข้าม — เปิดภายหลังได้ที่หน้าโปรไฟล์)
iPhone 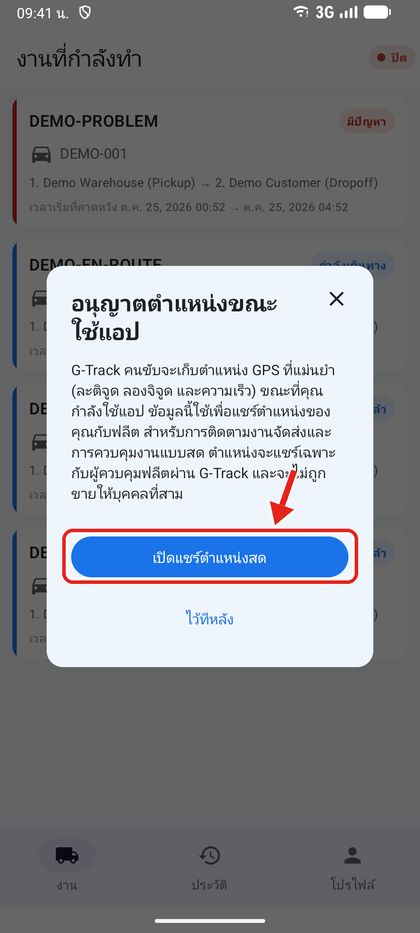
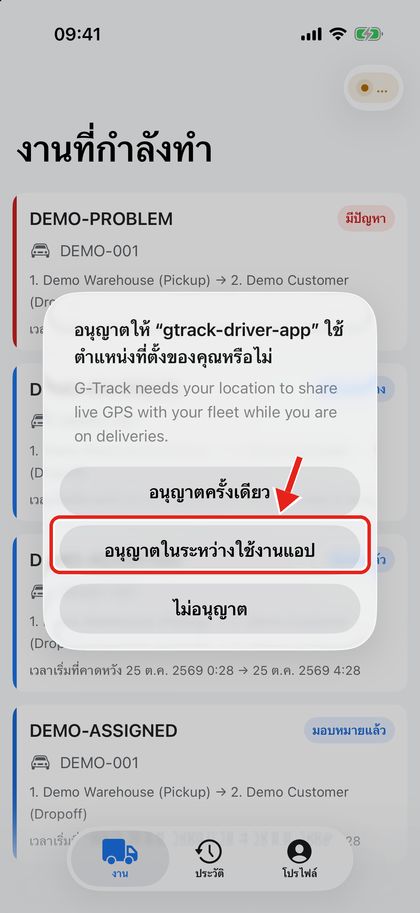
Android ในหน้าต่างของระบบ เลือก อนุญาตในระหว่างใช้งานแอป (iPhone) หรือ While using the app พร้อม Precise (Android)
iPhone 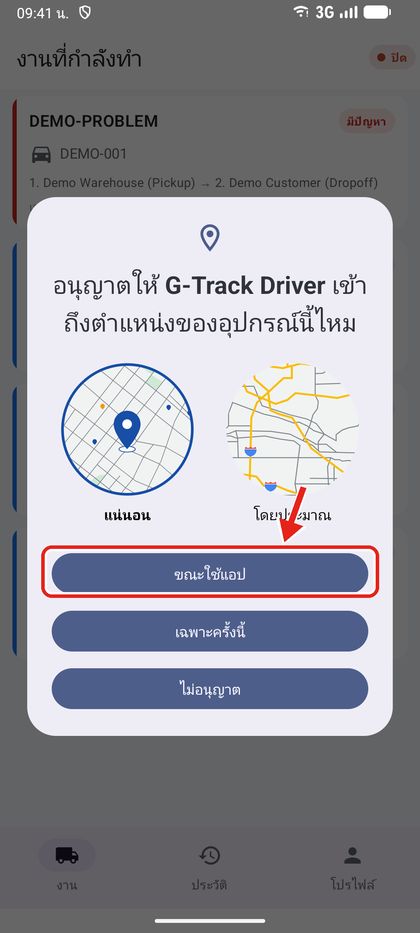
Android อนุญาตการแจ้งเตือน เพื่อรับการแจ้งงานใหม่และข้อความแชท (iPhone จะถามทันทีหลังเข้าสู่ระบบ)
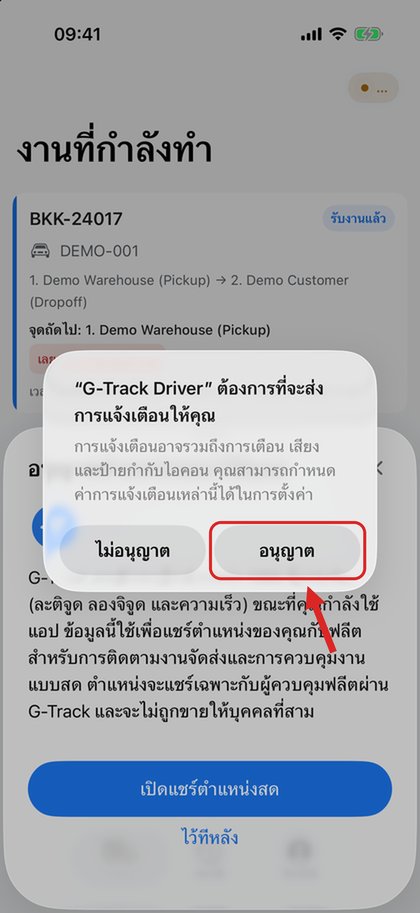
iPhone 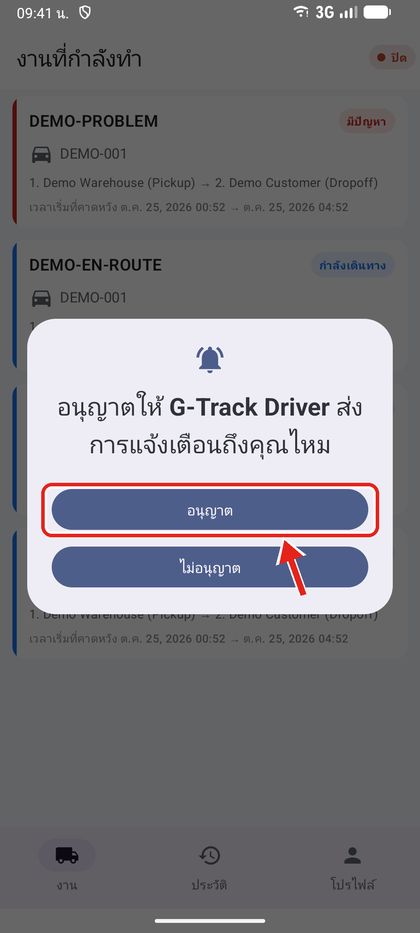
Android เพื่อให้ติดตามได้ต่อเนื่องแม้โทรศัพท์อยู่ในกระเป๋า ให้อนุญาตตำแหน่งเบื้องหลัง แอปจะแสดงหน้าที่สอง อนุญาตตำแหน่งตลอดเวลา — แตะ เปิดแชร์ตำแหน่งสด อีกครั้ง
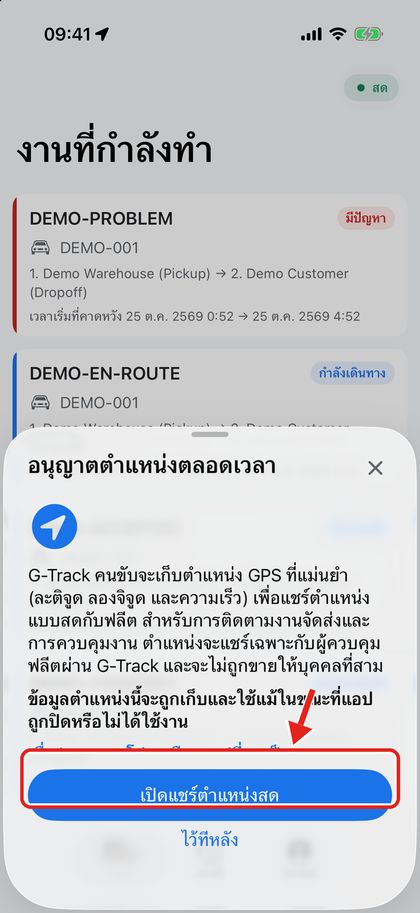
iPhone 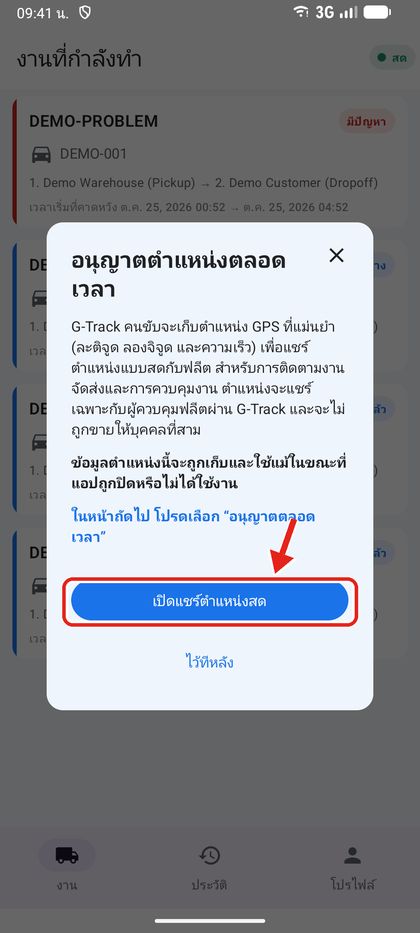
Android iPhone: iOS จะถามอีกครั้ง — เลือก เปลี่ยนเป็นอนุญาตเสมอ Android: หน้าการตั้งค่าระบบจะเปิดขึ้น — เลือก อนุญาตตลอด แล้วกดย้อนกลับ
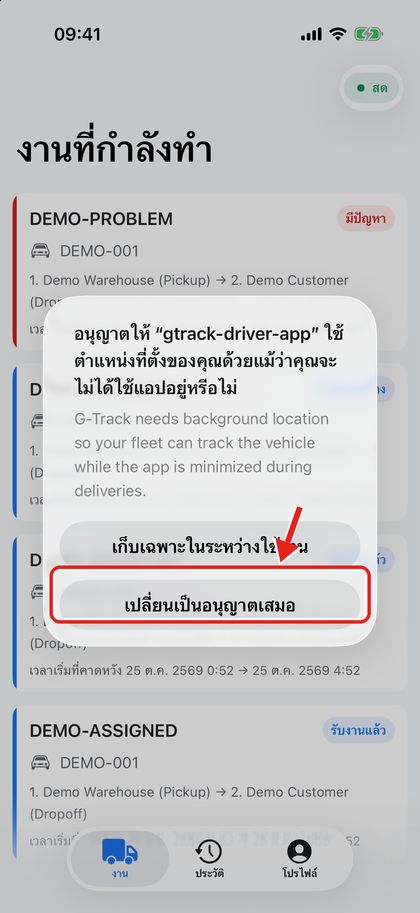
iPhone 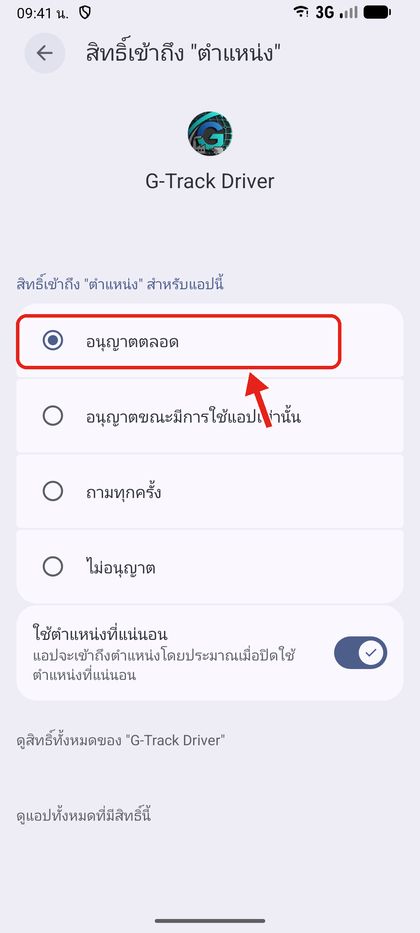
Android
ป้ายที่มุมขวาบนแสดงสถานะการติดตาม: สด สีเขียว = ตำแหน่งส่งถึงฟลีตแล้ว, สีส้ม = กำลังเชื่อมต่อ, ปิด = หยุดติดตาม
3งานของคุณ
แท็บ งาน แสดงงานจัดส่งที่ได้รับมอบหมายและยังไม่เสร็จทั้งหมด
การ์ดแต่ละใบแสดงรหัสงาน สถานะ ทะเบียนรถ ลำดับจุดแวะ และเวลาเริ่ม/สิ้นสุดที่คาดหวัง ดึงลงเพื่อรีเฟรช แตะการ์ดเพื่อเปิดงาน
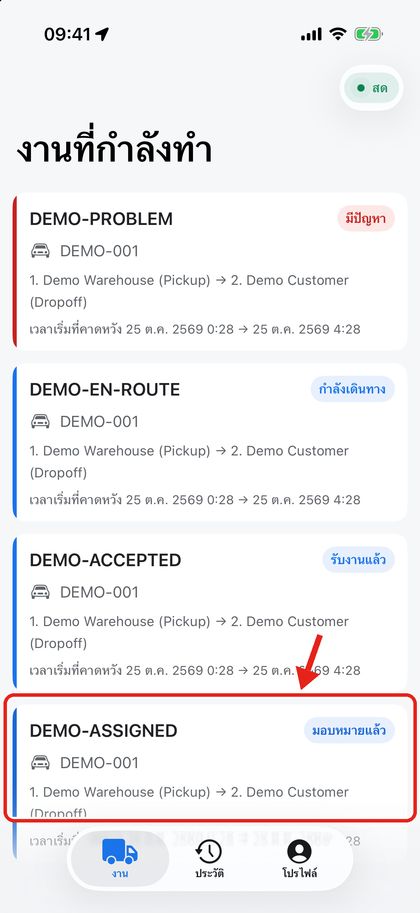
iPhone 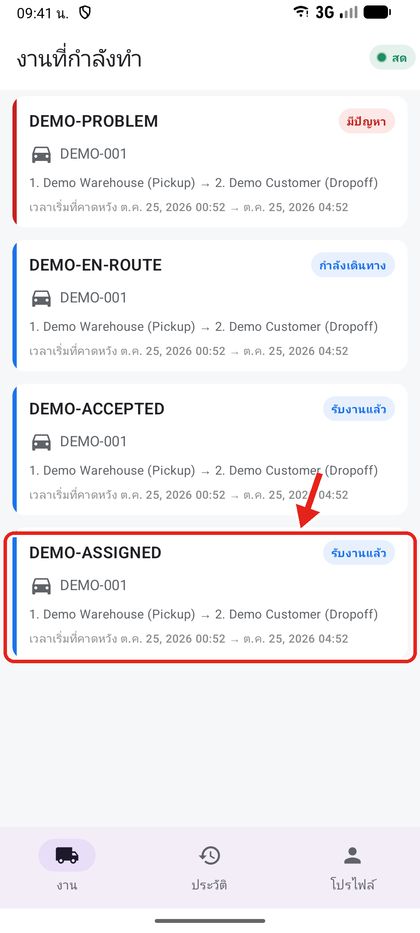
Android
4รายละเอียดงานและจุดแวะ
หน้ารายละเอียดงานมีข้อมูลทั้งหมดสำหรับการเดินทาง
สรุป แสดงสถานะ รถ เวลาที่วางแผน และน้ำหนัก หมายเหตุ มาจากผู้จัดงาน ปุ่มหลักคือ อัปเดตสถานะ และ เปิดแชท
iPhone 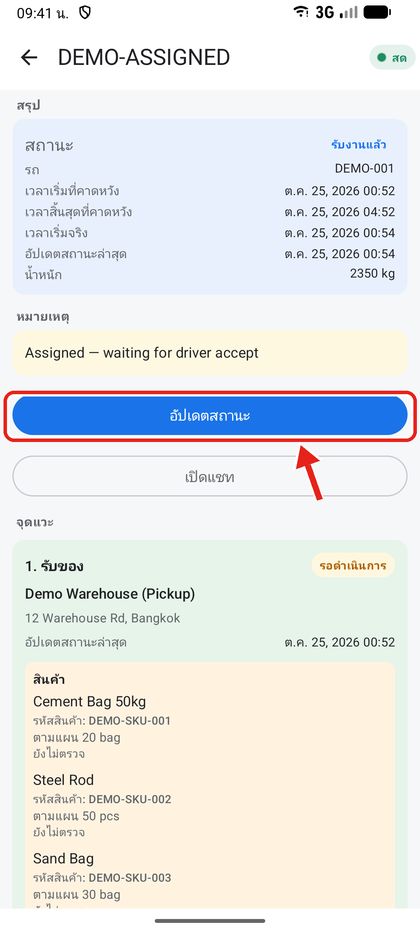
Android เลื่อนลงไปที่ จุดแวะ: แต่ละจุดรับและส่งของมีที่อยู่ สถานะ รายการสินค้าพร้อมจำนวนตามแผน และลิงก์ เพิ่มค่าใช้จ่าย ด้านล่างสุดคือ กิจกรรมล่าสุด ที่บันทึกทุกการเปลี่ยนสถานะ
iPhone 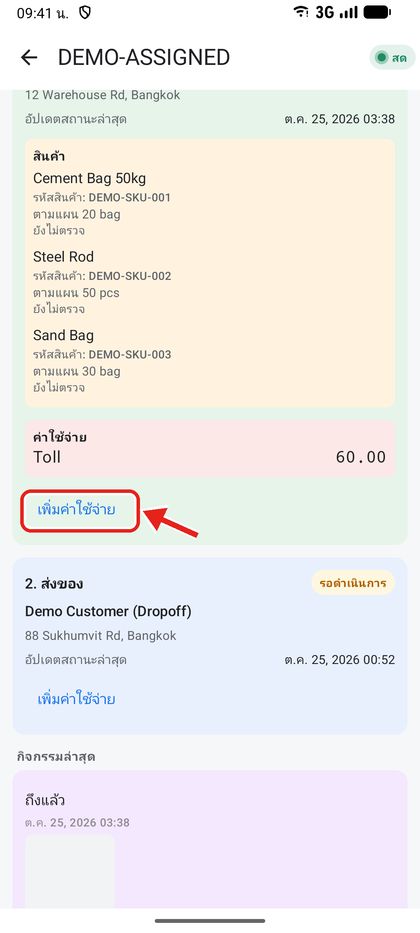
Android
5อัปเดตสถานะงาน
อัปเดตสถานะทุกครั้งที่ถึงขั้นตอนใหม่ แอปจะแสดงเฉพาะสถานะถัดไปที่ถูกต้อง: มอบหมายแล้ว → รับงานแล้ว → ถึงแล้ว → กำลังโหลด / กำลังขนลง → กำลังเดินทาง → … → เสร็จสิ้น และเลือก มีปัญหา ได้ทุกขั้นตอน
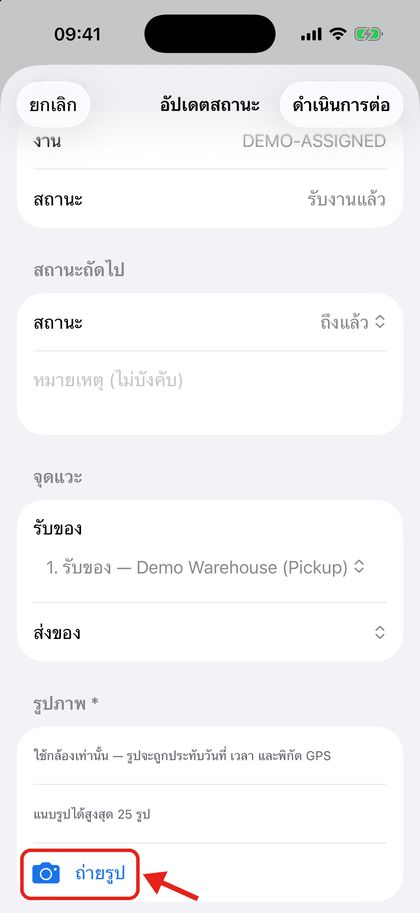
แตะ อัปเดตสถานะ หน้าจอจะแสดงสถานะปัจจุบัน สถานะถัดไป หมายเหตุ (ไม่บังคับ) และจุดแวะที่เกี่ยวข้อง
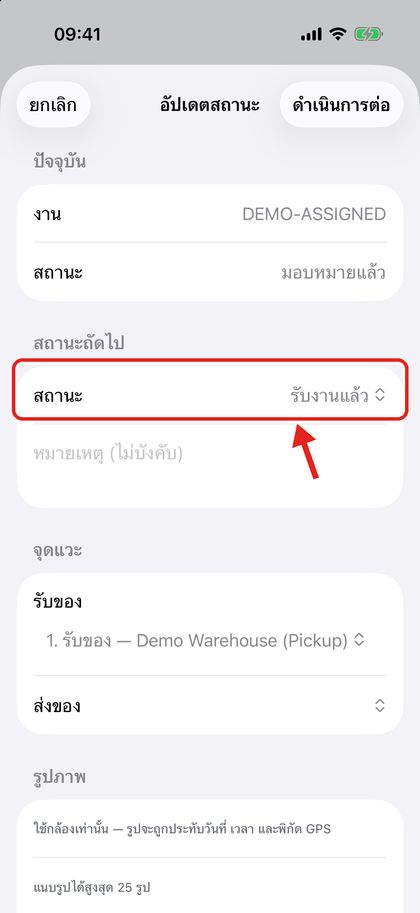
iPhone 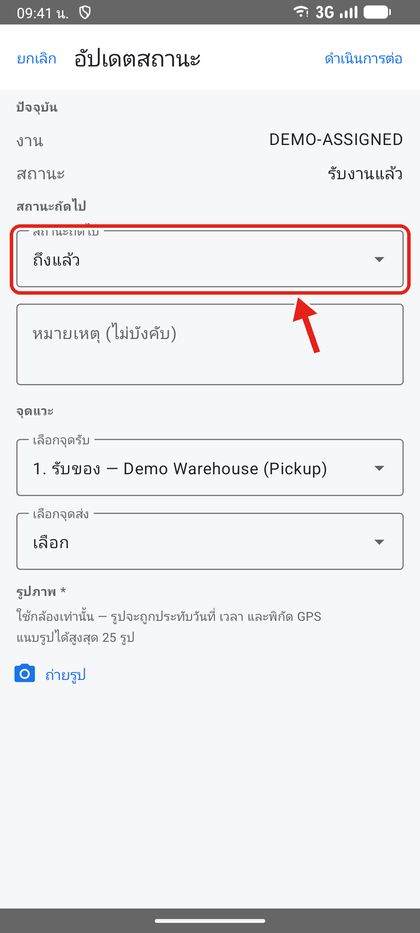
Android แตะ สถานะถัดไป เพื่อเลือกตัวเลือกอื่น เช่น มีปัญหา เมื่อเกิดเหตุขัดข้อง
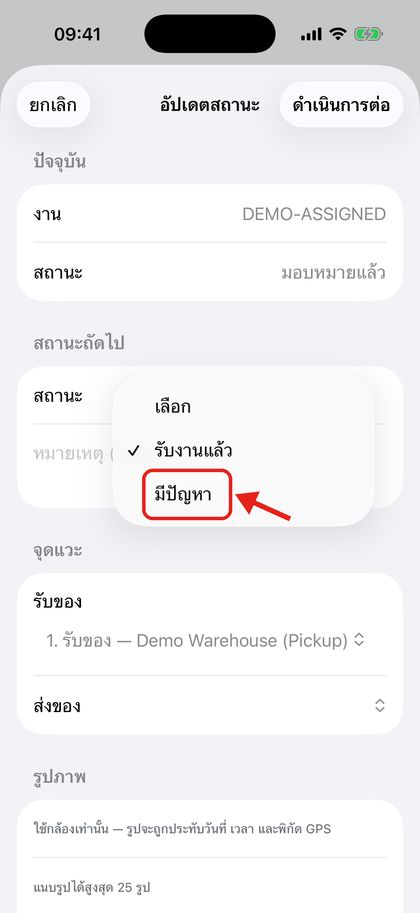
iPhone 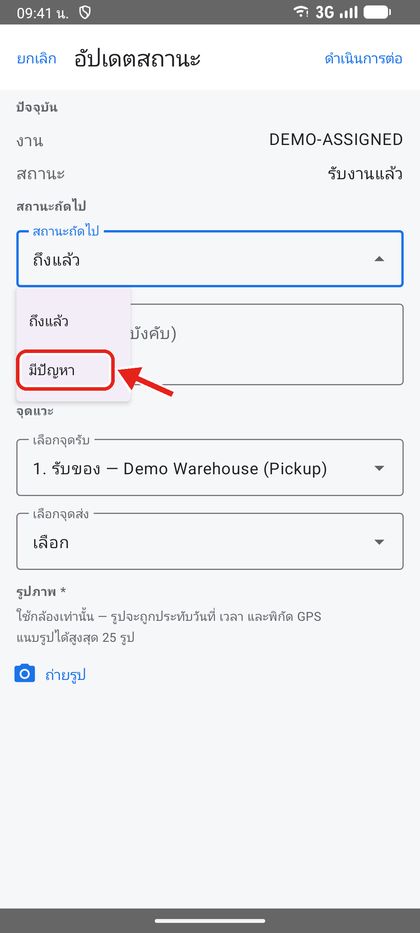
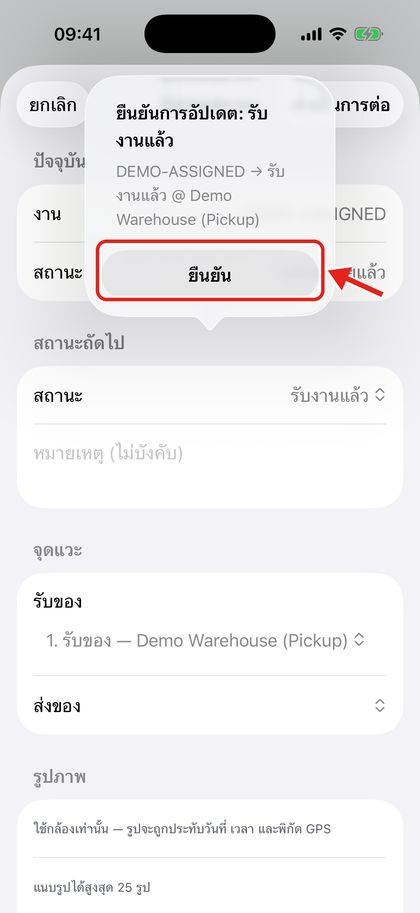
Android แตะ ดำเนินการต่อ ตรวจสอบสรุป แล้วแตะ ยืนยัน
iPhone 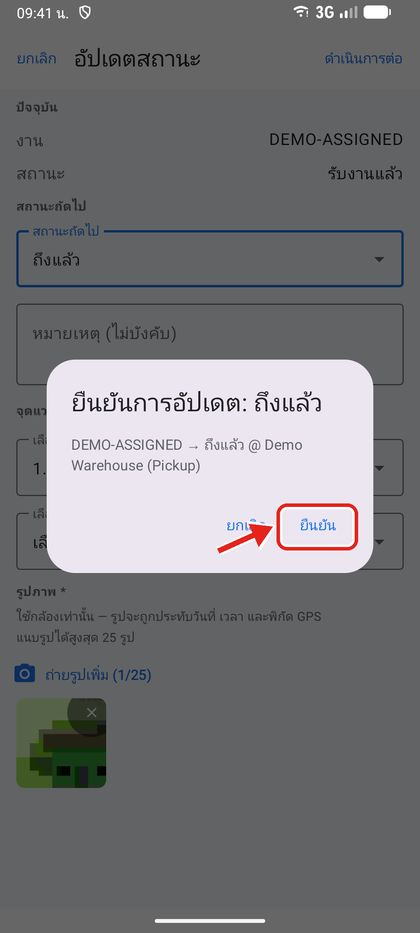
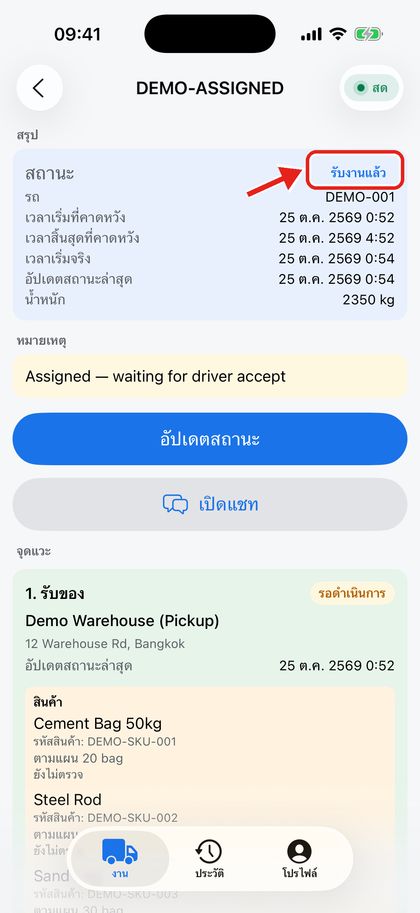
Android สถานะใหม่จะแสดงบนงานทันที และผู้จัดงานจะเห็นในระบบหลังบ้าน
iPhone 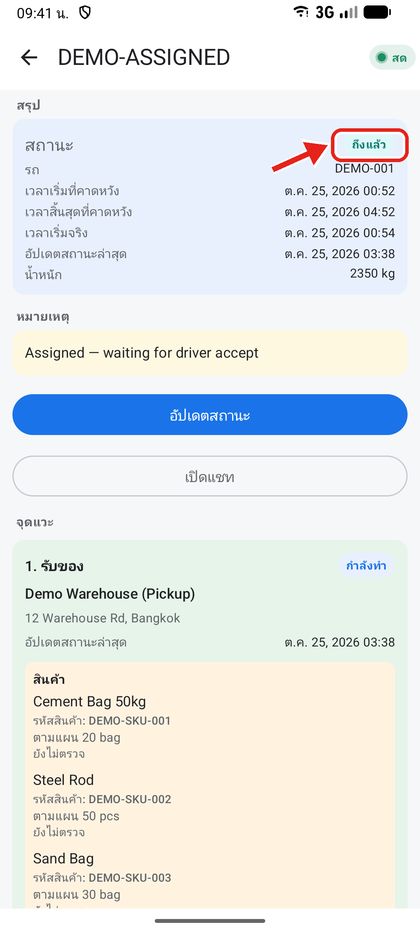
Android
6รูปถ่ายและรายการตรวจสินค้า
สถานะ ถึงแล้ว, กำลังโหลด และ กำลังขนลง ต้องแนบรูปอย่างน้อย 1 รูป ถ่ายจากกล้องเท่านั้น รูปจะประทับวันที่ เวลา และพิกัด GPS แนบได้สูงสุด 25 รูป
เมื่อสถานะถัดไปต้องใช้รูป หัวข้อ รูปภาพ * จะถูกทำเครื่องหมายว่าจำเป็น แตะ ถ่ายรูป
iPhone 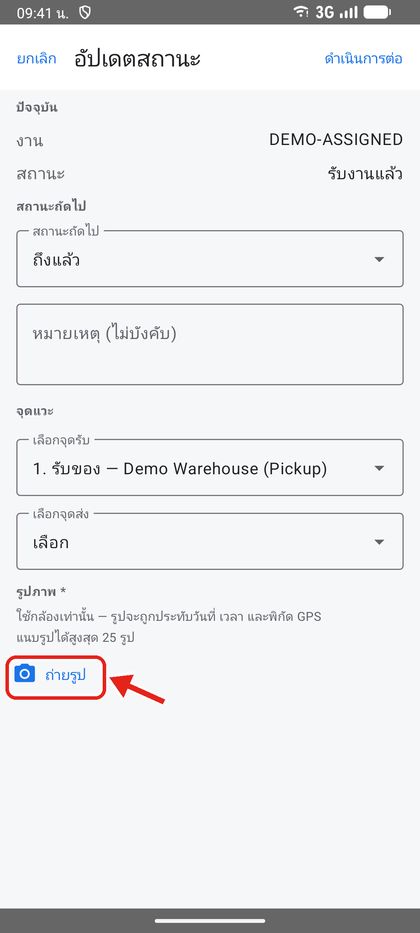
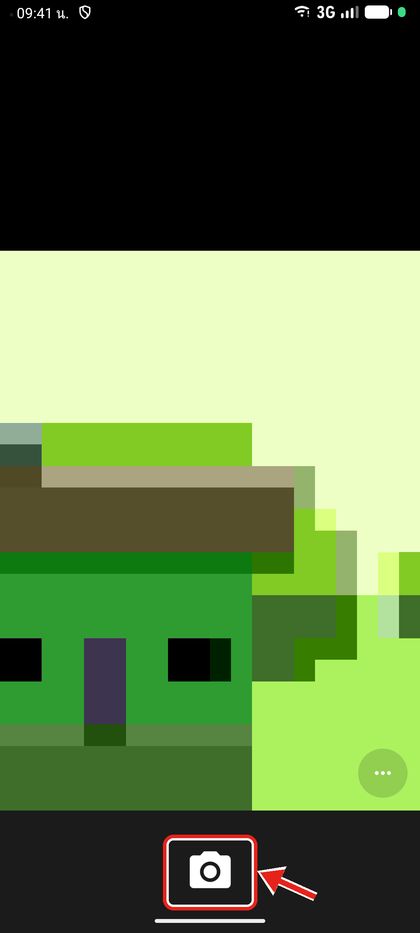
Android ถ่ายรูปด้วยกล้อง แล้วแตะเครื่องหมายถูกเพื่อใช้รูปนั้น (ครั้งแรกให้อนุญาตการใช้กล้อง)
Android รูปจะถูกแนบกับการอัปเดต แตะ ถ่ายรูปเพิ่ม เพื่อเพิ่มรูป หรือแตะ × เพื่อลบ แล้วแตะ ดำเนินการต่อ
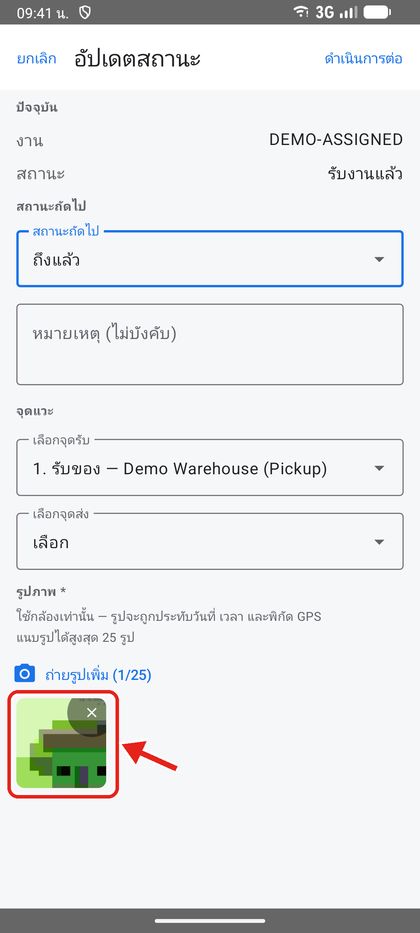
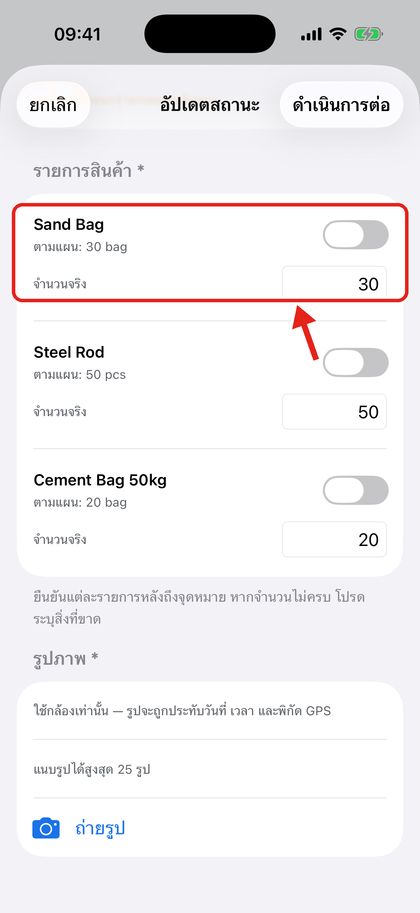
Android หลังถึงจุดหมาย เมื่อเปลี่ยนเป็น กำลังโหลด หรือ กำลังขนลง จะมี รายการสินค้า ให้ติ๊กทีละรายการและแก้ จำนวนจริง หากของไม่ครบให้ระบุสิ่งที่ขาด จุดแวะจะถูกล็อกจนกว่าจะกด กำลังเดินทาง
iPhone 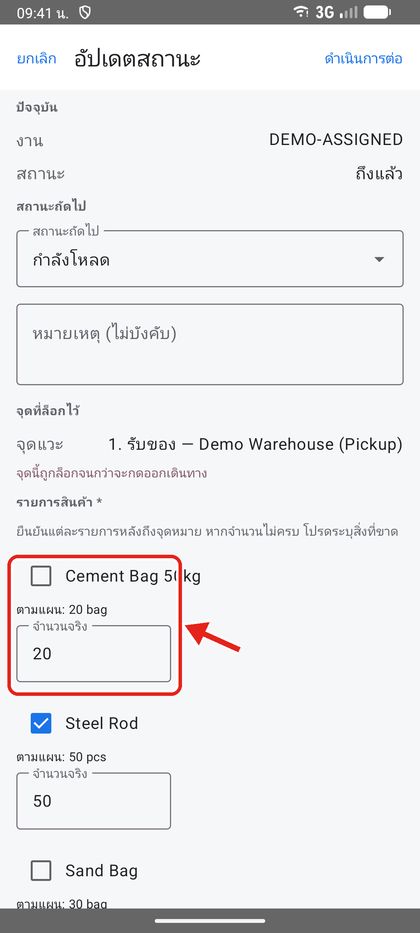
Android
iPhone Simulator ไม่มีกล้อง จึงแสดงหน้ากล้องจาก Android บน iPhone จริงกล้องจะเปิดในลักษณะเดียวกัน
7เพิ่มค่าใช้จ่าย
บันทึกค่าทางด่วน น้ำมัน ค่าจอด และค่าใช้จ่ายอื่นๆ ไว้กับจุดแวะที่เกิดค่าใช้จ่าย
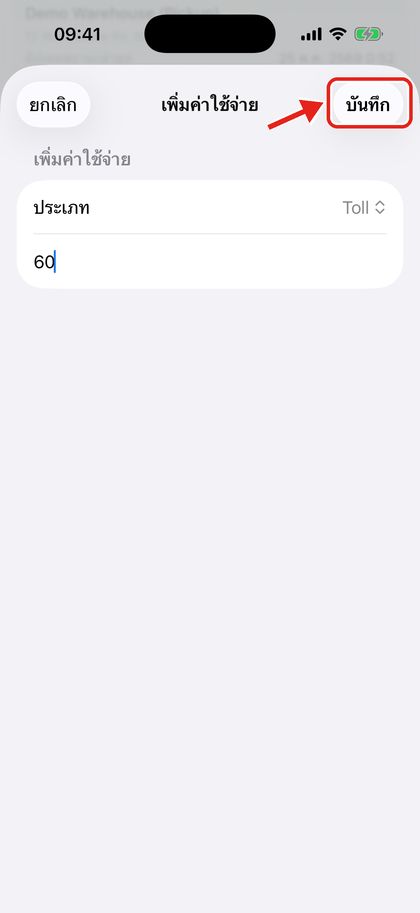
ใต้จุดแวะ แตะ เพิ่มค่าใช้จ่าย เลือก ประเภท (ทางด่วน น้ำมัน ค่าจอด อื่นๆ) กรอก จำนวนเงิน ใส่หมายเหตุเมื่อจำเป็น แล้วแตะ บันทึก
iPhone 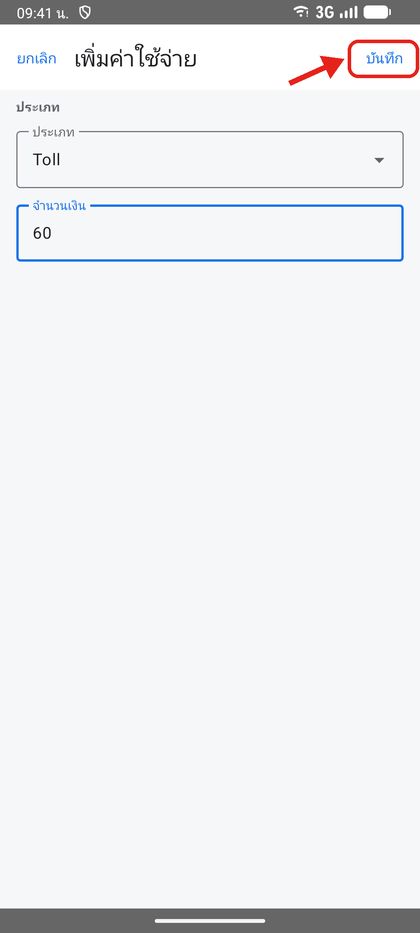
Android ค่าใช้จ่ายจะแสดงใต้จุดแวะในหัวข้อ ค่าใช้จ่าย
iPhone 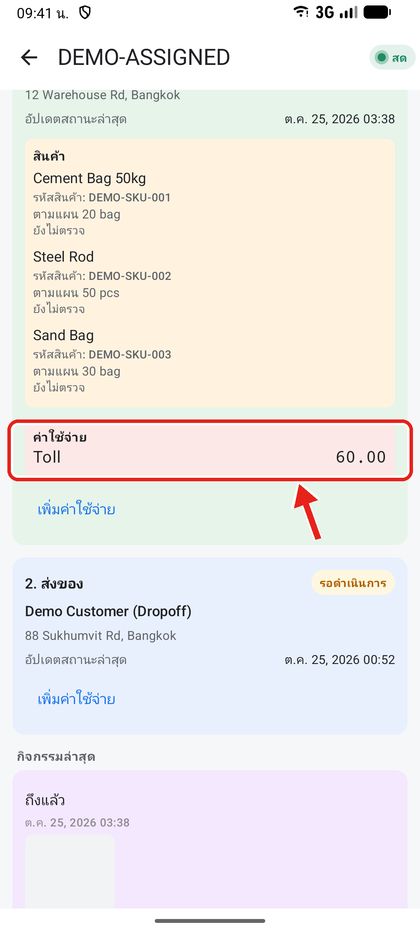
Android
8แชทกับผู้จัดงาน
ทุกงานมีห้องแชทของตัวเองกับสำนักงาน
ในหน้างาน แตะ เปิดแชท ข้อความจากผู้จัดงานอยู่ด้านซ้าย ข้อความของคุณอยู่ด้านขวา พิมพ์ในช่องด้านล่างแล้วแตะลูกศรส่ง
iPhone 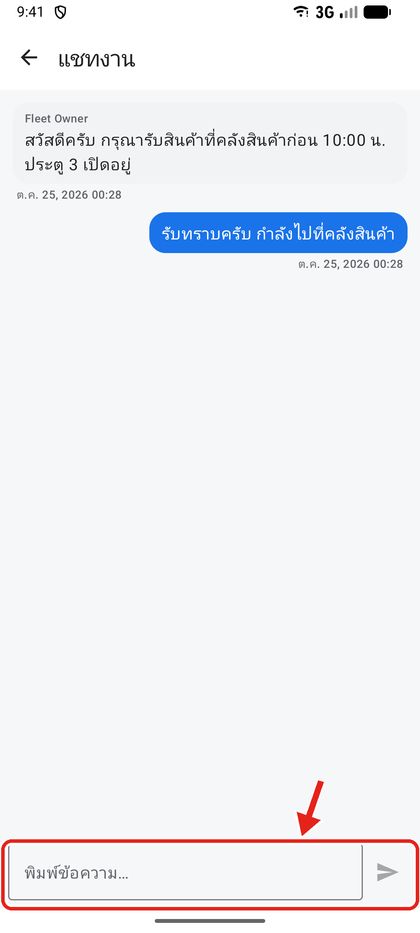
Android
9ประวัติ
งานที่เสร็จแล้วจะย้ายไปที่แท็บ ประวัติ
เปิดแท็บ ประวัติ เพื่อดูงานที่เสร็จสิ้น
iPhone 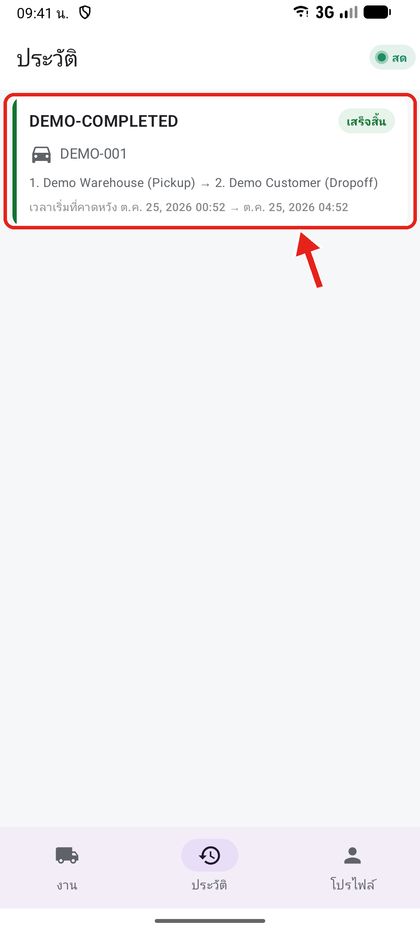
Android แตะงานเพื่อดูเวลา รายการสินค้าที่ตรวจแล้วและจำนวน และยังเปิดแชทของงานนั้นได้
iPhone 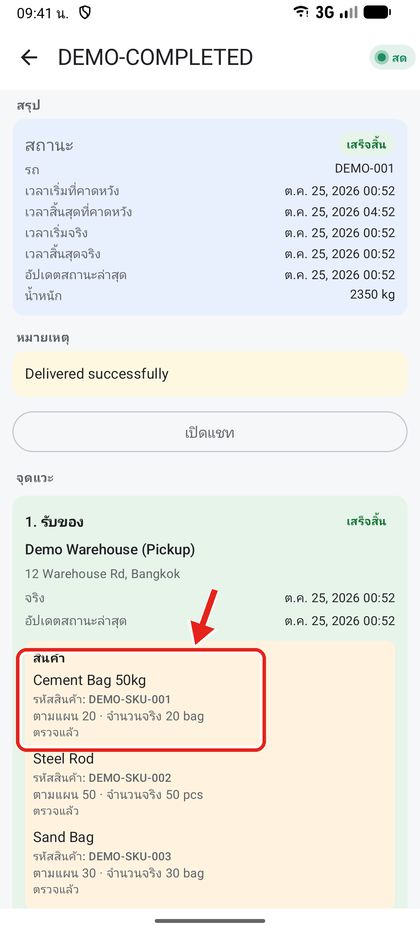
Android
10โปรไฟล์ การติดตาม และออกจากระบบ
แท็บ โปรไฟล์ แสดงข้อมูลของคุณและใช้ควบคุมการติดตาม
ด้านบน: ภาษา ข้อมูลคนขับ (ชื่อ อีเมล ใบขับขี่) และ รถ ที่ได้รับมอบหมายพร้อมเวลา GPS ล่าสุด
iPhone 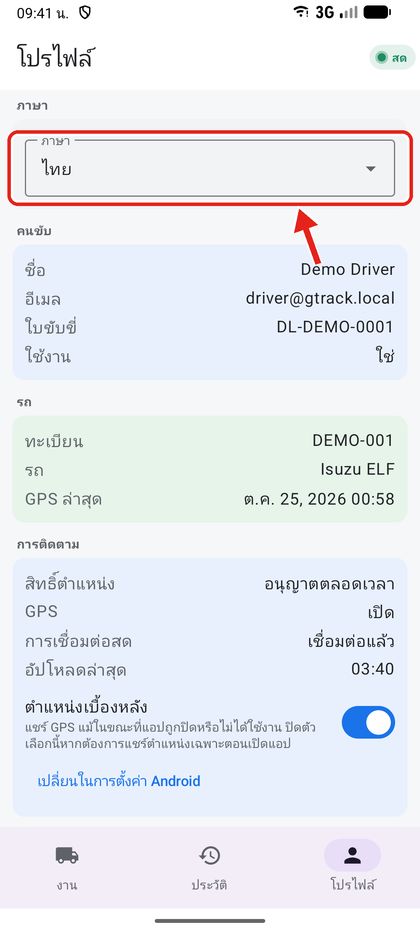
Android เลื่อนไปที่ การติดตาม: สิทธิ์ตำแหน่ง GPS การเชื่อมต่อสด และอัปโหลดล่าสุด ใช้สวิตช์ ตำแหน่งเบื้องหลัง หากต้องการแชร์เฉพาะตอนเปิดแอป แตะ เปลี่ยนในการตั้งค่า เพื่อแก้สิทธิ์ และ เริ่มติดตาม หากการติดตามหยุดอยู่ ปุ่ม ออกจากระบบ อยู่ด้านล่างสุด
iPhone 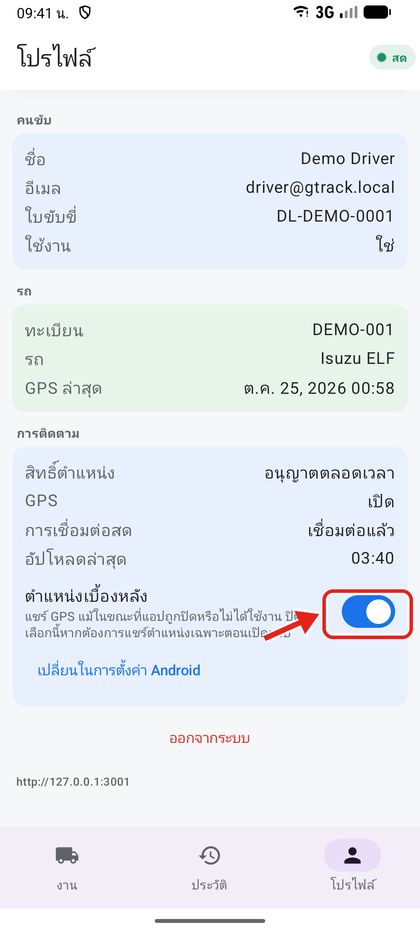
Android
11การแจ้งเตือน
ทั้ง iPhone และ Android ได้รับการแจ้งเตือนงานใหม่และข้อความแชท แม้ขณะเปิดแอปอยู่ แตะการแจ้งเตือนเพื่อเปิดงานหรือแชทนั้น
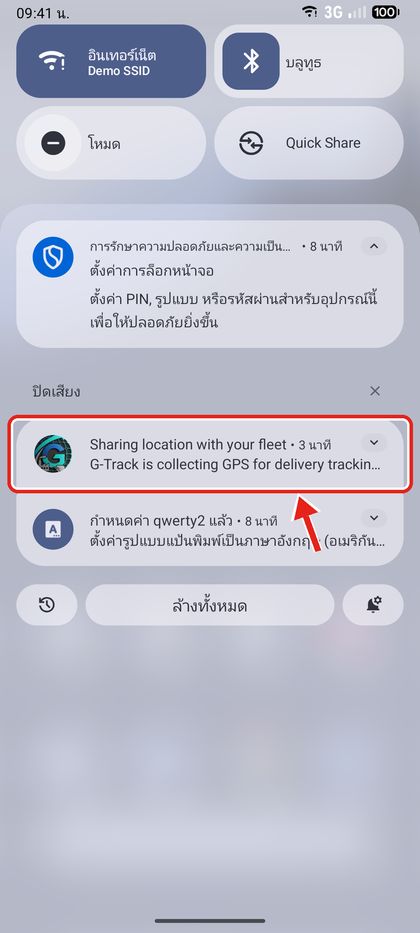
บน Android จะมีการแจ้งเตือนค้างไว้ตลอดเวลาที่กำลังแชร์ตำแหน่งด้วย เพื่อให้การติดตามทำงานในเบื้องหลังได้
Android: ปัดลงจากด้านบนของหน้าจอเพื่อดูการแจ้งเตือน Sharing location with your fleet (ข้อความนี้แสดงเป็นภาษาอังกฤษ)
Android
iPhone ไม่มีการแจ้งเตือนขณะติดตาม — iOS จะแสดงลูกศรตำแหน่งสีฟ้าที่แถบสถานะแทน หากไม่ได้รับการแจ้งเตือน ให้เปิด การตั้งค่า → G-Track Driver → การแจ้งเตือน แล้วเปิด อนุญาตการแจ้งเตือน
12การแก้ปัญหา
- ป้ายแสดง ปิด หรือเป็นสีส้มค้างไว้
- ตรวจว่าเปิด GPS และมีสัญญาณ ที่ โปรไฟล์ → การติดตาม แตะ เริ่มติดตาม หากสิทธิ์ตำแหน่งยังไม่ใช่ ตลอดเวลา ให้แตะ เปลี่ยนในการตั้งค่า
- ขึ้นข้อความว่าต้องมีรูป
- สถานะ ถึงแล้ว / กำลังโหลด / กำลังขนลง ต้องแนบรูปจากกล้องอย่างน้อย 1 รูป แตะ ถ่ายรูป ก่อน ดำเนินการต่อ
- เลือกจุดแวะอื่นไม่ได้
- หลังถึงจุดหมาย จุดแวะจะถูกล็อกจนกว่าจะตั้งสถานะ กำลังเดินทาง ให้ทำจุดปัจจุบันให้เสร็จก่อน
- กดไม่อนุญาตสิทธิ์โดยไม่ตั้งใจ
- เปิด การตั้งค่า ของโทรศัพท์ → G-Track Driver แล้วอนุญาต ตำแหน่ง (ตลอดเวลา) กล้อง และการแจ้งเตือน
- เข้าสู่ระบบไม่ได้
- ตรวจสอบอีเมลและรหัสผ่านกับสำนักงาน เฉพาะบัญชีคนขับเท่านั้นที่ใช้แอปได้